1. About
About SecHub
SecHub stands for "Security Hub" and serves as an unified API to scan for various security issues. With SecHub, users don’t need to worry about the specific scanning product used on the server side; they simply configure their desired security goals.
|
The SecHub server alone does NOT provide a security infrastructure but orchestrates different security products/tools. Please check our ready to use security open source tools: PDS solutions for integration with SecHub server. |
It was designed to be very easy to integrate into existing build / contionus integration (CI) pipelines and helps to provide SecDevOps.
|
You can get more documentation from the SecHub web page . The project is hosted at https://github.com/mercedes-benz/sechub |
About documentation
This documentation is part of SecHub.
| Key | Value | Information |
|---|---|---|
LICENSE |
MIT License |
Please look at https://github.com/mercedes-benz/sechub/blob/master/LICENSE |
Documentation version: Server 2.14.0 - Build date: 2025-09-01 14:49 (UTCZ)
Target audience for this document are SecHub Operators/Administrators.
2. SecHub Server
2.1. Download
You can download the ready to use .jar binary of SecHub Server.
Download link to the latest SecHub Server release: https://mercedes-benz.github.io/sechub/latest/server-download.html For documentation, please look at SecHub web page .
2.2. Configuration
2.2.1. Database configuration
2.2.1.1. PostgreSQL
First of all, install a PostgreSQL database.
Then define following environment entries before you start the server with active postgres profile:
-
POSTGRES_DB_URL
-
POSTGRES_DB_USERNAME
-
POSTGRES_DB_PASSWORD
Examples:
POSTGRES_DB_URL=jdbc:postgresql://127.0.0.1:49152/sechub
POSTGRES_DB_USERNAME=sechub-pg-admin
POSTGRES_DB_PASSWORD=a-very-strong-password...
2.2.2. General configuration
SecHub can be configured by keys on server startup.
Using the spring @Value annotation we are able to
use these keys as Java system properties but also as environment entries.
E.g. a key like sechub.server.baseurl can be set with
java ... -Dsechub.server.baseurl=https://sechub.example.org
or with an environment entry SECHUB_SERVER_BASEURL which
is e.g. more suitable for a kubernetes cluster deployment.
The next text blocks describe the keys available on SecHub:
| Key or variable name | Default | Description |
|---|---|---|
sechub.user.onetimetoken.outdated.millis |
86400000 |
One time token time when outdating |
| Key or variable name | Default | Description |
|---|---|---|
sechub.feature.showProductResultLink |
false |
Administrators can turn on this mode to allow product links in json and HTML output |
sechub.initialadmin.apitoken |
An apitoken for initial admin, will only be used in DEV and INTEGRATIONTEST profiles and is optional! |
|
sechub.initialadmin.email |
Mail of initial administrator |
|
sechub.initialadmin.userid |
Userid of initial administrator |
|
sechub.server.baseurl |
Base url of SecHub server - e.g. https://sechub.example.org |
| Key or variable name | Default | Description |
|---|---|---|
sechub.notification.email.mock.cache.enabled |
false |
When email mock shall cache the mails this must be configured to true, per default disabled! |
sechub.server.debug |
false |
When debug flag is set, rest call reponse error messages do also contain stacktraces. |
| Key or variable name | Default | Description |
|---|---|---|
sechub.email.rule.allowed-domains |
The allowed domains for email addresses of SecHub users. A comma separated list of strings like: 'example.com,company.org'. If nothing is specified all domains are allowed. |
| Key or variable name | Default | Description |
|---|---|---|
sechub.schedule.encryption.refresh.accept-outdated.milliseconds |
1800000 |
The maximum amount of milliseconds an outdated encryption pool is still accepted in refresh phase |
| Key or variable name | Default | Description |
|---|---|---|
sechub.config.trigger.healthcheck.enabled |
true |
When enabled each trigger will do an health check by monitoring service. If system has too much CPU load or uses too much memory, the trigger will not execute until memory and CPU load is at normal level! |
sechub.config.trigger.nextjob.delay |
10000 |
Define delay for next job execution trigger after last executed. |
sechub.config.trigger.nextjob.initialdelay |
5000 |
Define initial delay for next job execution trigger. Interesting inside a cluster - just define this value different inside your instances (e.g. random value). This avoids write operations at same time. |
sechub.config.trigger.nextjob.maxwaitretry |
300 |
When retry mechanism is enabled by |
sechub.config.trigger.nextjob.retries |
5 |
Inside a cluster the next job fetching can lead to concurrent access. When this happens a retry can be done for the 'looser'. This value defines the amount of *tries*If you do not want any retries set the value to a value lower than 2. 2 Means after one execution failed there is one retry. Values lower than 2 will lead to one try of execution only. |
sechub.project.joblist.page.max |
100 |
|
sechub.project.joblist.size.max |
100 |
Maximum limit for job information list entries per page |
sechub.schedule.nextjob.suspend.miniumum-duration.milliseconds |
60000 |
The scheduler automatically restarts the next suspended jobs, regardless of the defined schedule strategy. This is done to get suspended jobs of another shut down instance back up and running as quickly as possible. To avoid suspended jobs being restarted too quickly, you can use this value to set the minimum time that must pass before the next suspended job can be restarted. The value is defined in milliseconds. The (previous) end date of the suspended job is used. For example, this value is important for K8s redeployment, because the servers that have not yet been updated should not immediately continue with the suspended jobs - they will also be shut down soon and would suspend the restarted jobs again… |
sechub.scheduler.strategy.id |
Define the scheduler strategy by given identifier. This strategy determines the next job which shall be executed by job scheduler. Possible values are:first-come-first-serve,only-one-scan-per-project-at-a-time and only-one-scan-per-project-and-module-group |
|
sechub.server.upload.validate.checksum |
true |
With |
sechub.server.upload.validate.zip |
true |
With |
sechub.upload.binaries.maximum.bytes |
52428800 |
Define the maximum amount of bytes accepted for uploading |
| Key or variable name | Default | Description |
|---|---|---|
sechub.security.encryption |
||
sechub.security.encryption.secret-key |
The secret key for encryption (used for cookies etc.). Must be an exactly 256 bit long string |
|
sechub.security.login |
||
sechub.security.login.classic-auth |
Configuration for classic mode, only relevant when login modes contain 'classic' |
|
sechub.security.login.classic-auth.cookie-age-seconds |
Cookie age in seconds. |
|
sechub.security.login.enabled |
Defines if login enabled or not |
|
sechub.security.login.login-page |
The login page which can be used by external client (like WebUI) |
|
sechub.security.login.modes |
The login modes to use as a comma separated list. Possible values are 'oauth2' and 'classic' |
|
sechub.security.login.oauth2 |
Configuration for oauth2, only relevant when login modes contain 'oauth2' |
|
sechub.security.login.oauth2.authorization-uri |
URI that identifies the Authorization Server. For example: https://idp.example.org/oauth2/v2/auth |
|
sechub.security.login.oauth2.client-id |
The client id used for oauth2 login handling |
|
sechub.security.login.oauth2.client-secret |
The client secret used for oauth2 login handling |
|
sechub.security.login.oauth2.issuer-uri |
URI that identifies the issuer. For example: https://idp.example.org |
|
sechub.security.login.oauth2.jwk-set-uri |
URI for jwk. For example: https://idp.example.org/oauth2/v3/certs |
|
sechub.security.login.oauth2.provider |
Name of the oauth2 provider. For example 'keycloak' |
|
sechub.security.login.oauth2.redirect-uri |
This is the callback URI where the IDP will redirect the user after successful login; 'https://<sechub-server-host>/login/oauth2/code/<provider>'. For most IDPs this URI has to be configured inside the IDP client |
|
sechub.security.login.oauth2.token-uri |
Represents the URI for the token endpoint. For example: https://idp.example.org/oauth2/v4/token |
|
sechub.security.login.oauth2.user-info-uri |
URI for user information. For example: https://idp.example.org/oauth2/v3/userinfo |
|
sechub.security.login.redirect-uri |
The redirect URI after a succesful login is done |
|
sechub.security.minimum-token-validity |
The minimum token expiration time, used as a minimum for cookie ages and token validity. If set higher than the default values it will always overwrite the default values. Uses standard java duration syntax. For example '60m' means sixty minutes, '1d' means one day. |
|
sechub.security.server |
||
sechub.security.server.modes |
The server modes to use as a comma separated list. Possible values are 'oauth2' and 'classic' |
|
sechub.security.server.oauth2 |
||
sechub.security.server.oauth2.jwt |
||
sechub.security.server.oauth2.jwt.jwk-set-uri |
URI for jwk. For example: https://idp.example.com/oauth2/v3/certs |
|
sechub.security.server.oauth2.mode |
The oauth2 mode to use. Can be either 'jwt' or 'opaque-token' |
|
sechub.security.server.oauth2.opaque-token |
||
sechub.security.server.oauth2.opaque-token.client-id |
Client id for oauth2 client being used for opaque token handling |
|
sechub.security.server.oauth2.opaque-token.client-secret |
The secret for the oauth2 client being used for opaque token handling |
|
sechub.security.server.oauth2.opaque-token.cluster-cache-clear-period |
The period until the in cluster cache will trigger a cleanup which removes expired values. Uses standard java duration syntax. For example '10s' means 10 seconds, '1m' means one minute. |
|
sechub.security.server.oauth2.opaque-token.default-token-expires-in |
The default token expiration time. Is used as fallback when IDP does not provide an expiration time. Uses standard java duration syntax. For example '60m' means sixty minutes, '1d' means one day. |
|
sechub.security.server.oauth2.opaque-token.inmemory-cache-clear-period |
The period until the in memory cache will trigger a cleanup which removes expired values. Uses standard java duration syntax. For example '10s' means 10 seconds, '1m' means one minute. |
|
sechub.security.server.oauth2.opaque-token.introspection-uri |
Introspection URI of the identify provider, will be used to check if the given opaque token from login is valid. |
|
sechub.security.server.oauth2.opaque-token.max-cache-duration |
The maximum cache duration. To avoid that the IDP is always asked again about the validity of an opaquetoken, the acceptance is cached. When this time exceeds,the introspection will be done and cached again. Uses standard java duration syntax. For example '60m' means sixty minutes, '1d' means one day. |
|
sechub.security.server.oauth2.opaque-token.pre-cache-duration |
The pre cache duration: If a cluster wide cache is provided by the application, the in memory cache is acting as a precache to avoid too many cluster checks. In this case the in memory cache will not use the IDP expiration as cache timeout, but this one. If a value is no longer found in the short cache it will be retrieved by cluster cache. Uses standard java duration syntax. For example '10s' means 10 seconds, '1m' means one minute. |
| Key or variable name | Default | Description |
|---|---|---|
sechub.migration.flyway.autorepair |
true |
When enabled, flyway migration problems will be automatically repaired |
| Key or variable name | Default | Description |
|---|---|---|
sechub.monitoring.accepted.cpu.average.max |
2.0 |
Maximum CPU load average accepted by sechub system. Value is calculated by measured system load average divided by available processors. A value above 1.0 usually means that a processor is very heavily loaded. |
sechub.monitoring.accepted.memory.usage.max |
90.0 |
Maximum memory usage percentage accepted by sechub system. Can be a value from 50 up to 100 for 100% |
sechub.monitoring.cache.time.millis |
2000 |
Time in milliseconds monitoring fetch results are cached before fetching again |
| Key or variable name | Default | Description |
|---|---|---|
sechub.adapter.nessus.defaultpolicyid |
deprecated |
Default policy ID for nessus scans |
sechub.adapter.nessus.internet.baseurl |
deprecated |
Base url of nessus used for internet scans |
sechub.adapter.nessus.internet.password |
deprecated |
Password for nessus instance used for internet scans |
sechub.adapter.nessus.internet.userid |
deprecated |
User id of nessus user (internet) |
sechub.adapter.nessus.intranet.baseurl |
deprecated |
Base url of nessus used for intranet scans |
sechub.adapter.nessus.intranet.password |
deprecated |
Password for nessus instance used for intranet scans |
sechub.adapter.nessus.intranet.userid |
deprecated |
User id of nessus user (intranet) |
sechub.adapter.nessus.proxy.hostname |
Proxy hostname for nessus server connection, when empty no proxy is used. When not empty proxy port must be set too! |
|
sechub.adapter.nessus.proxy.port |
0 |
Proxy port for nessus server connection, default is 0. If you are setting a proxy hostname you have to configure this value correctly |
sechub.adapter.nessus.scanresultcheck.period.minutes |
-1 |
Time in minutes when adapter result check will automatically time out and adapter stops execution automatically. When -1 timeout is 7200 minutes |
sechub.adapter.nessus.scanresultcheck.timeout.minutes |
-1 |
Time in minutes when adapter result check will automatically time out and adapter stops execution automatically. When -1 timeout is 7200 minutes |
sechub.adapter.nessus.trustall |
true |
Turns off certification checks for this product only. Should only be used in test or development environments! |
| Key or variable name | Default | Description |
|---|---|---|
sechub.adapter.netsparker.agentname |
deprecated |
The name of the agent to be used by netsparker. If a agent group name is already defined the group will be superiour. If no group set and no agent name netsparker will use a agent but seems to be unpredictable which agent will be used. |
sechub.adapter.netsparker.apitoken |
deprecated |
API token for netsparker user |
sechub.adapter.netsparker.baseurl |
deprecated |
Base url for netsparker installation |
sechub.adapter.netsparker.defaultpolicyid |
deprecated |
Default policy ID for netsparker scans |
sechub.adapter.netsparker.internet.agentgroupname |
deprecated |
The name of the agent group to be used by netsparker for intranet scans. If not set no agent group will be used. |
sechub.adapter.netsparker.intranet.agentgroupname |
deprecated |
The name of the agent group to be used by netsparker for intranet scans. If not set no agent group will be used. |
sechub.adapter.netsparker.licenseid |
deprecated |
|
sechub.adapter.netsparker.scanresultcheck.period.minutes |
-1 |
Time in minutes when adapter result check will automatically time out and adapter stops execution automatically. When -1 timeout is 7200 minutes |
sechub.adapter.netsparker.scanresultcheck.timeout.minutes |
-1 |
Time in minutes when adapter check operation is called next. When -1 value is 1 minutes |
sechub.adapter.netsparker.trustall |
true |
Turns off certification checks for this product only. Should only be used in test or development environments! |
sechub.adapter.netsparker.userid |
deprecated |
user id of netsparker user |
| Key or variable name | Default | Description |
|---|---|---|
sechub.notification.email.administrators |
Single email address used for emails to administrators. This should be a NPM (non personalized mailbox) |
|
sechub.notification.email.from |
Address used for emails sent by sechub system |
|
sechub.notification.email.replyto |
Address used for reply when email was sent by sechub system |
|
sechub.notification.scheduler.startup.enabled |
true |
When enabled, administrators will be informed by notification when new scheduler instances are started. Those notifications will also contain information about potential zombie jobs. When disabled, incoming events will be ignored and no notification sent. |
sechub.notification.smtp.config |
mail.smtp.auth=false,mail.transport.protocol=smtp |
SMTP configuration map. You can setup all java mail smtp settings here in comma separate form with key=value. For Example: |
sechub.notification.smtp.credential.password |
Password on SMPTP server, empty value means no password |
|
sechub.notification.smtp.credential.username |
Username on SMPTP server, empty value means no username |
|
sechub.notification.smtp.hostname |
Hostname of SMPTP server |
|
sechub.notification.smtp.port |
25 |
Port of SMPTP server, per default:25 |
| Key or variable name | Default | Description |
|---|---|---|
sechub.assistant.ai.openai.api-token |
API token |
|
sechub.assistant.ai.openai.completions-uri |
Completions URI for open AI. Examples: https://api.openai.com/v1/chat/completions or https://your-apigateway.example.com/connect/opeanai/chat-gpt40o/chat/completions?version=2024-02-01 |
|
sechub.assistant.ai.openai.model |
Model to use |
| Key or variable name | Default | Description |
|---|---|---|
sechub.adapter.checkmarx.resilience.badrequest.retry.max |
3 |
Amount of retries done when a 400 bad request happened on Checkmarx server |
sechub.adapter.checkmarx.resilience.badrequest.retry.wait |
2000 |
Time to wait until retry is done when a 400 bad request happened on Checkmarx server |
sechub.adapter.checkmarx.resilience.servererror.retry.max |
1 |
Amount of retries done when a 500 server internal error happened on Checkmarx server |
sechub.adapter.checkmarx.resilience.servererror.retry.wait |
5000 |
Time to wait until retry is done when a 500 server internal error happened on Checkmarx server |
sechub.adapter.pds.default.check.timetowait.milliseconds |
30000 |
Time in milliseconds when adapter check operation is called next. When -1 value is 60000 minutes |
sechub.adapter.pds.default.timeout.minutes |
240 |
Time in minutes when adapter result check will automatically time out and adapter stops execution automatically. When -1 timeout is 7200 minutes |
sechub.adapter.pds.resilience.encryption-out-of-sync.retry.max |
3 |
Amount of retries done when a PDS encryption out of sync problem happens |
sechub.adapter.pds.resilience.encryption-out-of-sync.retry.wait |
2000 |
Time to wait until retry is done when a PDS encryption out of sync problem happens |
| Key or variable name | Default | Description |
|---|---|---|
sechub.adapter.checkmarx.resilience.badrequest.retry.max |
3 |
Maximum amount of possible retries for situations when a 400 bad request happened on Checkmarx server |
sechub.adapter.checkmarx.resilience.badrequest.retry.wait |
2000 |
Time to wait until retry is done when a 400 bad request happened on Checkmarx server |
sechub.adapter.checkmarx.resilience.networkerror.retry.max |
100 |
Maximum amount of possible retries for situations when a network error happened on communication to Checkmarx server |
sechub.adapter.checkmarx.resilience.networkerror.retry.wait |
5000 |
Time to wait until retry is done when a network server happened on communication to Checkmarx server |
sechub.adapter.checkmarx.resilience.servererror.retry.max |
1 |
Maximum amount of possible retries for situations when a 500 server internal error happened on Checkmarx server |
sechub.adapter.checkmarx.resilience.servererror.retry.wait |
5000 |
Time to wait until retry is done when a 500 server internal error happened on Checkmarx server |
sechub.adapter.checkmarx.scanresultcheck.period.minutes |
-1 |
Time in minutes when adapter check operation is called next. When -1 value is 1 minutes |
sechub.adapter.checkmarx.scanresultcheck.timeout.minutes |
-1 |
Time in minutes when adapter result check will automatically time out and adapter stops execution automatically. When -1 timeout is 7200 minutes |
sechub.adapter.checkmarx.trustall |
false |
Turns off certification checks for this product only. Should only be used in test or development environments! |
| Key or variable name | Default | Description |
|---|---|---|
sechub.config.check.canceljob.delay |
60000 |
Define delay in milliseconds, for before next job cancellation check will be executed. |
sechub.config.scan.scanconfig.refresh.delay |
5000 |
Define delay (in milliseconds) for next job execution trigger after last executed. |
sechub.config.scan.scanconfig.refresh.initialdelay |
0 |
Define initial delay (in milliseconds) for scan config refresh check operation. |
sechub.report.sensitivedata.max.nonobfuscated.characters |
0 |
Define the amount of visible characters which are NOT obfuscated. |
sechub.target.resolve.strategy.ip |
Strategy to decide target types by given IP. |
|
sechub.target.resolve.strategy.uri |
One ore more strategies to decide target types by given URI. |
| Key or variable name | Default | Description |
|---|---|---|
sechub.security.diffiehellman.length |
Define diffie hellman key length, see https://github.com/mercedes-benz/sechub/issues/689 for details |
| Key or variable name | Default | Description |
|---|---|---|
sechub.storage.s3.accesskey |
undefined |
Defines the access key for used S3 bucket |
sechub.storage.s3.bucketname |
undefined |
Defines the S3 bucket name |
sechub.storage.s3.connection.idle.max.milliseconds |
60000 |
S3 client maximum idle time (in milliseconds) for a connection in the connection pool. |
sechub.storage.s3.connection.idle.validate.milliseconds |
5000 |
S3 client time (in milliseconds) a connection can be idle in the connection pool before it must be validated that it’s still open. |
sechub.storage.s3.connection.max.poolsize |
50 |
S3 client max connection pool size. |
sechub.storage.s3.connection.ttl.milliseconds |
-1 |
S3 client expiration time (in milliseconds) for a connection in the connection pool. -1 means deactivated |
sechub.storage.s3.endpoint |
undefined |
Defines the S3 endpoint - e.g. https://play.min.io |
sechub.storage.s3.region |
undefined |
S3 client region. Supported are offical AWS region names and additionally: |
sechub.storage.s3.secretkey |
undefined |
Defines the secret key for used S3 bucket |
sechub.storage.s3.signer.override |
AWSS3V4SignerType |
Can be used to override the default name of the signature algorithm used to sign requests. |
sechub.storage.s3.timeout.connection.milliseconds |
10000 |
S3 client timeout (in milliseconds) for creating new connections. |
sechub.storage.s3.timeout.execution.milliseconds |
0 |
S3 client timeout (in milliseconds) for execution. 0 means it is disabled. |
sechub.storage.s3.timeout.request.milliseconds |
0 |
S3 client timeout (in milliseconds) for a request. 0 means it is disabled. |
sechub.storage.s3.timeout.socket.milliseconds |
50000 |
S3 client timeout (in milliseconds) for reading from a connected socket. |
sechub.storage.sharedvolume.upload.dir |
undefined |
Defines the root path for shared volume uploads - e.g. for sourcecode.zip etc. When using keyword temp as path, this will create a temporary directory (for testing). |
2.2.3. Scheduling definitions
| Type | Definition | Description |
|---|---|---|
Fixed |
initial delay:${sechub.config.trigger.autoclean.initialdelay:5000} fixed delay:${sechub.config.trigger.autoclean.delay:86400000} |
Auto cleanup is triggered by a cron job operation - default is one day to delay after last execution. As initial delay 5000 milliseconds are defined. It can be configured differently. This is useful when you need to startup a cluster. Simply change the initial delay values in to allow the cluster to startup. |
| Type | Definition | Description |
|---|---|---|
Fixed |
initial delay:${sechub.schedule.encryption.refresh.initialdelay:5000} fixed delay:${sechub.schedule.encryption.refresh.delay:300000} |
Defines the initial and also the fixed delay for the refresh interval. These values are also used for calculation of remaining run time of outdated encrytion pools (when refresh fails) |
| Type | Definition | Description |
|---|---|---|
Fixed |
initial delay:${sechub.config.trigger.nextjob.initialdelay:5000} fixed delay:${sechub.config.trigger.nextjob.delay:10000} |
Job scheduling is triggered by a cron job operation - default is 10 seconds to delay after last execution. For initial delay 5000 milliseconds are defined. It can be configured differently. This is useful when you need to startup a cluster. Simply change the initial delay values in to allow the cluster to startup. |
2.3. Deployment
2.3.1. Database
SecHub requires a PostgreSQL DB, Version > 10.x
2.3.1.1. Plain server
In this scenario you can just install a PostgreSQL DB instance on your SecHub server machine.
2.3.1.2. Kubernetes
Here you need to deploy a PostgreSQL DB server in your Kubernetes namespace.
|
Think about regular database backups - no matter which variant you choose… |
2.3.2. File upload storage
SecHub requires a shared file system folder to store uploads.
This can be a shared disk, a network share (e.g. NFS) or a S3 storage.
|
In a clustered environment like Kubernetes the storage must be accessible by every cluster member! |
2.3.3. Server Application
SecHub server is a written in Java and needs at least JDK 17.
You can configure the SecHub server by system properties or also by environment variables.
The next sections describe necessary system properties and their environment variable pendants.
2.3.3.1. Mandatory configuration
| Next lines will show java launcher properties which MUST be set because there are no defaults defined. You have to define those values when not starting in mock mode! The example her is generated and will always show the current necessary parts. |
-Dspring.profiles.active=dev,postgres,real_products
-Dsechub.initialadmin.email=value
-Dsechub.initialadmin.userid=value
-Dsechub.server.baseurl=value
-Dsechub.email.rule.allowed-domains=value
-Dsechub.security.encryption=value
-Dsechub.security.encryption.secret-key=value
-Dsechub.security.login=value
-Dsechub.security.login.classic-auth=value
-Dsechub.security.login.classic-auth.cookie-age-seconds=value
-Dsechub.security.login.enabled=value
-Dsechub.security.login.login-page=value
-Dsechub.security.login.modes=value
-Dsechub.security.login.oauth2=value
-Dsechub.security.login.oauth2.authorization-uri=value
-Dsechub.security.login.oauth2.client-id=value
-Dsechub.security.login.oauth2.client-secret=value
-Dsechub.security.login.oauth2.issuer-uri=value
-Dsechub.security.login.oauth2.jwk-set-uri=value
-Dsechub.security.login.oauth2.provider=value
-Dsechub.security.login.oauth2.redirect-uri=value
-Dsechub.security.login.oauth2.token-uri=value
-Dsechub.security.login.oauth2.user-info-uri=value
-Dsechub.security.login.redirect-uri=value
-Dsechub.security.minimum-token-validity=value
-Dsechub.security.server=value
-Dsechub.security.server.modes=value
-Dsechub.security.server.oauth2=value
-Dsechub.security.server.oauth2.jwt=value
-Dsechub.security.server.oauth2.jwt.jwk-set-uri=value
-Dsechub.security.server.oauth2.mode=value
-Dsechub.security.server.oauth2.opaque-token=value
-Dsechub.security.server.oauth2.opaque-token.client-id=value
-Dsechub.security.server.oauth2.opaque-token.client-secret=value
-Dsechub.security.server.oauth2.opaque-token.cluster-cache-clear-period=value
-Dsechub.security.server.oauth2.opaque-token.default-token-expires-in=value
-Dsechub.security.server.oauth2.opaque-token.inmemory-cache-clear-period=value
-Dsechub.security.server.oauth2.opaque-token.introspection-uri=value
-Dsechub.security.server.oauth2.opaque-token.max-cache-duration=value
-Dsechub.security.server.oauth2.opaque-token.pre-cache-duration=value
-Dsechub.notification.email.administrators=value
-Dsechub.notification.email.from=value
-Dsechub.notification.smtp.hostname=value
-Dsechub.assistant.ai.openai.api-token=value
-Dsechub.assistant.ai.openai.completions-uri=value
-Dsechub.assistant.ai.openai.model=value
-Dsechub.security.diffiehellman.length=value
| Instead of java system properties you can also define environment entries at your launch configuration or your shell and reduce parameter hell: |
export SPRING_PROFILES_ACTIVE=dev,postgres,real_products
export SECHUB_INITIALADMIN_EMAIL=value
export SECHUB_INITIALADMIN_USERID=value
export SECHUB_SERVER_BASEURL=value
export SECHUB_EMAIL_RULE_ALLOWEDDOMAINS=value
export SECHUB_SECURITY_ENCRYPTION=value
export SECHUB_SECURITY_ENCRYPTION_SECRETKEY=value
export SECHUB_SECURITY_LOGIN=value
export SECHUB_SECURITY_LOGIN_CLASSICAUTH=value
export SECHUB_SECURITY_LOGIN_CLASSICAUTH_COOKIEAGESECONDS=value
export SECHUB_SECURITY_LOGIN_ENABLED=value
export SECHUB_SECURITY_LOGIN_LOGINPAGE=value
export SECHUB_SECURITY_LOGIN_MODES=value
export SECHUB_SECURITY_LOGIN_OAUTH2=value
export SECHUB_SECURITY_LOGIN_OAUTH2_AUTHORIZATIONURI=value
export SECHUB_SECURITY_LOGIN_OAUTH2_CLIENTID=value
export SECHUB_SECURITY_LOGIN_OAUTH2_CLIENTSECRET=value
export SECHUB_SECURITY_LOGIN_OAUTH2_ISSUERURI=value
export SECHUB_SECURITY_LOGIN_OAUTH2_JWKSETURI=value
export SECHUB_SECURITY_LOGIN_OAUTH2_PROVIDER=value
export SECHUB_SECURITY_LOGIN_OAUTH2_REDIRECTURI=value
export SECHUB_SECURITY_LOGIN_OAUTH2_TOKENURI=value
export SECHUB_SECURITY_LOGIN_OAUTH2_USERINFOURI=value
export SECHUB_SECURITY_LOGIN_REDIRECTURI=value
export SECHUB_SECURITY_MINIMUMTOKENVALIDITY=value
export SECHUB_SECURITY_SERVER=value
export SECHUB_SECURITY_SERVER_MODES=value
export SECHUB_SECURITY_SERVER_OAUTH2=value
export SECHUB_SECURITY_SERVER_OAUTH2_JWT=value
export SECHUB_SECURITY_SERVER_OAUTH2_JWT_JWKSETURI=value
export SECHUB_SECURITY_SERVER_OAUTH2_MODE=value
export SECHUB_SECURITY_SERVER_OAUTH2_OPAQUETOKEN=value
export SECHUB_SECURITY_SERVER_OAUTH2_OPAQUETOKEN_CLIENTID=value
export SECHUB_SECURITY_SERVER_OAUTH2_OPAQUETOKEN_CLIENTSECRET=value
export SECHUB_SECURITY_SERVER_OAUTH2_OPAQUETOKEN_CLUSTERCACHECLEARPERIOD=value
export SECHUB_SECURITY_SERVER_OAUTH2_OPAQUETOKEN_DEFAULTTOKENEXPIRESIN=value
export SECHUB_SECURITY_SERVER_OAUTH2_OPAQUETOKEN_INMEMORYCACHECLEARPERIOD=value
export SECHUB_SECURITY_SERVER_OAUTH2_OPAQUETOKEN_INTROSPECTIONURI=value
export SECHUB_SECURITY_SERVER_OAUTH2_OPAQUETOKEN_MAXCACHEDURATION=value
export SECHUB_SECURITY_SERVER_OAUTH2_OPAQUETOKEN_PRECACHEDURATION=value
export SECHUB_NOTIFICATION_EMAIL_ADMINISTRATORS=value
export SECHUB_NOTIFICATION_EMAIL_FROM=value
export SECHUB_NOTIFICATION_SMTP_HOSTNAME=value
export SECHUB_ASSISTANT_AI_OPENAI_APITOKEN=value
export SECHUB_ASSISTANT_AI_OPENAI_COMPLETIONSURI=value
export SECHUB_ASSISTANT_AI_OPENAI_MODEL=value
export SECHUB_SECURITY_DIFFIEHELLMAN_LENGTH=value
|
Please don’t forget to have at least one server running with active profile Servers without having this profile activated, will provide only standard API access. Reason for this behavior: Administrators can reduce access to administrative API by IP and port firewall settings. This is only necessary for production! Development and Integrationtest profiles do automatically include
the An example for production: |
2.3.3.1.1. Storage configuration
In SecHub we need to store job data (e.g. zipped source code).
At least one storage setup must be defined- otherwise SecHub server will not start! You can either define a shared volume (normally a NFS) or a S3 storage.
Look at Storage configuration for configuration details.
2.3.3.2. Start the server locally
Start the server by executing
java ${systemProperties} -jar sechub-server-x.y.z.jar
Where ${systemProperties} is a place holder for Java system properties or
you use environment entries (configuration is explained in common chapter before)
2.3.3.3. Run in Docker
The public Docker image can be found at https://github.com/mercedes-benz/sechub/pkgs/container/sechub%2Fsechub-server
The SecHub server can be simply run like this
docker run ghcr.io/mercedes-benz/sechub/sechub-server2.3.3.4. Run in Kubernetes
We provide a Helm chart for the container image above: https://github.com/mercedes-benz/sechub/pkgs/container/sechub%2Fhelm-charts%2Fsechub-server
Same as before described for plain server, but you should use a copy of the values.yaml and adapt it to your needs.
helm pull oci://ghcr.io/mercedes-benz/sechub/helm-charts/sechub-server
tar zxf sechub-server-*.tgz
cp sechub-server/values.yaml sechub-server.yaml
# edit "sechub-server.yaml" file and adapt settings

# Deploy SecHub server to your Kubernetes:
helm install sechub-server sechub-server/ -f ./sechub-server.yaml
2.3.3.4.1. Logging
SecHub uses per default logging to stdout. So you have to change this behaviour for your server when you want to change log output format, location etc.
Please refer spring boot documentation for logging: https://docs.spring.io/spring-boot/docs/current/reference/html/boot-features-logging.html
2.3.3.4.2. Activating server encryption of sensitive data
Some configuration data provided to SecHub may contain secrets (e.g. for DAST).
If you do not want that data in plain text in your database, you need to activate encryption.
The following steps use the sechub-api.sh helper script.
Query the encryption status
sechub-api.sh server_encryption_statusIn order to enable encryption for SecHub server follow these steps:
-
Create an encryption key
-
Create a random 16- (AES_GCM_SIV_128) or 32-character string (AES_GCM_SIV_256) <string> and
echo -n '<string>' | base64
Example:echo -n 'Example Example Example Example ' | base64 -
Alternatively you can use the Developer Admin UI > Encryption > Secret Key Generator
-
-
Put the encryption key into an environment variable for your SecHub server
(For Kubernetes you can do this via the Helm chart)
Example:export SERVER_ENCRYPTION_SECRET_KEY_1='RXhhbXBsZSBFeGFtcGxlIEV4YW1wbGUgRXhhbXBsZSA=' -
Start SecHub server / deploy in Kubernetes
-
Activate encryption
sechub-api.sh server_encryption_rotate <algorithm> var=<env var name>
Please check the return code / server messages
Example:sechub-api.sh server_encryption_rotate AES_GCM_SIV_256 var=SERVER_ENCRYPTION_SECRET_KEY_1 -
Verify
Runsechub-api.sh server_encryption_statusmultiple times. Now you should see that all ended jobs are getting encrypted.
You can change the encryption key by following above steps to define another environment variable containing the new encryption key (e.g. SERVER_ENCRYPTION_SECRET_KEY_2).Make sure that environment variables are set for all active encryption setups! |
2.4. Mapping
Mapping is used for simple key value configuration, but also for more sophisticated behaviour like done in scan configuration.
The mapping concept can be either used in a global persisted way, or in a dynmaic way like done for parameter mappings in product executor configuration .
2.4.1. REST API for global mapping
A global configuration can be done by REST API. The data is defined in JSON.
2.4.2. JSON structure
Given JSON has following structure:
{
  "entries" : [ {
    "pattern" : "pattern_1",
    "replacement" : "replacement_1",
    "comment" : "comment_1"
  },
  {
  "pattern" : "pattern_2",
    "replacement" : "replacement_2",
    "comment" : "comment_2"
  },
  //..
  {
    "pattern" : "pattern_n",
    "replacement" : "replacement_n",
    "comment" : "comment_n"
  } ]
}
here an example for a suitable checkmarx mapping (checkmarx.newproject.teamid)
{
  "entries" : [ {
    "pattern" : "testproject_*",
    "replacement" : "1",
    "comment" : "Maps all projects starting with name testproject_ to dedicated checkmarx team ID"
  }, {
    "pattern" : ".*",
    "replacement" : "2",
    "comment" : "Default checkmarx team id for all other projects"
  } ]
}
2.5. Execution profiles
An execution profile can contain multiple executor configurations. The configurations can be shared between multiple profiles.
|
As an example: a config with name "pds-gosec-1" can be used in profiles "profileA" and also "profileB" at the same time. |
When a profile is assigned to a project and the profile is enabled, all of its enabled executor configurations are executed for the project when suitable for code scan type.
|
To have a scan job running, at least one executor configuration must match - otherwise you will have always a "green" scan result. |
2.6. Executor configuration
SecHub uses product executors to call security products by dedicated product adapters.
Each used security product has at least one executor configuration.
Inside such a configuration, we can define properties and parameters which are used when it comes to SecHub job execution. The data is evaluated and used by product executors at runtime and no server restart is necessary.
So for example you can easily change a base URL of a product location and it will automatically be used by next job execution.
|
At the moment They ignore
You still have to configure the ignored parts by system environment variables (or system properties) in a global way and you can’t change these settings at runtime. |
2.6.1. Data structure
2.6.1.1. Name
Just the name of the executor configuration. Can be changed.
2.6.1.2. Enabled
Only when the executor configuration is enabled, it will be used (of course it has also be added to an enabled profile and this to a project).
2.6.1.3. UUID
Unmodifiaable unique ID of an executor configuration. Cannot be changed.
2.6.1.4. Product identifier
The product identifier for the product executor to use. Examples are:
-
PDS_CODESCAN -
PDS_WEBSCAN -
PDS_INFRASCAN -
PDS_LICENSESCAN
2.6.1.5. Executor version
At the moment all product executors exists only in version 1 and as long as there is no
breaking change the exisitng product executor will be extended and the existing version will be kept.
When there are breaking changes - e.g. the communication between SecHub and a new version of the security product becomes completely different, or parameters have a complete other meaning, an additional product executor with another version will be available.
2.6.1.6. Product base URL
Here we define the base URL to the security product including port number.
As an example: https://checkmarx.example.org:6011
2.6.1.7. Product credentials
To use a security product, we always need login credentials. These credentials must be defined inside the configuration.
2.6.1.7.1. Environment variable references
To store no real credentials in SecHub database, you can reference SecHub server environment
variables instead - just use the pattern env:${variableName}.
SecHub server will store the given pattern in database, but the content of the environment variable will be used at runtime when it comes to authentication.
|
Example for an environment variable reference: Let’s assume a have a running PDS server which accepts "exampleToken" as API token for technical user. You would add export PDS_CODESCAN1_APITOKEN=exampleToken at the beginning of your start script for SecHub server. In your executor configuration you would set the API token field to |
2.6.1.7.2. User
The user name used by SecHub to authenticate at security product.
2.6.1.7.3. Password or API token
The password or API token used by SecHub to authenticate at security product.
| It is strongly recommended to use environment variable references environment variable references here instead of plain text. |
2.6.1.8. Parameters
Parameters are used at job execution runtime to setup product adapters and to change security product behaviours.
2.6.1.8.1. Mappings
Some product executors do need special mappings - e.g for new project creations. Please look at mapping for more details about the concept and the format.
2.6.1.8.2. Key values
It is also possible to provide just dedicated key value parameters.
2.6.2. Product specific details
2.6.2.1. PDS
For PDS we have a set of predefined configuration parameters (see next table) and the possibility to define custom parameters.
Some of the predefined parameters are generated. In this case the user cannot define them in the executor configuration, but they are listed here for the sake of completeness.
| Key | Description | Additional info |
|---|---|---|
sechub.productexecutor.pds.forbidden.targettype.internet |
When this key is set to true, then this PDS instance does not scan INTERNET! |
|
sechub.productexecutor.pds.forbidden.targettype.intranet |
When this key is set to true, then this PDS instance does not scan INTRANET! |
|
sechub.productexecutor.pds.timetowait.nextcheck.milliseconds |
When this is set, the value will be used to wait for next check on PDS server. If not, the default from PDS install set up is used instead. |
|
sechub.productexecutor.pds.timeout.minutes |
When this is set, the value will be used to wait before timeout happens when no communication with PDS server is possible. If not, the default from PDS install set up is used instead. |
|
sechub.productexecutor.pds.trustall.certificates |
When 'true' then all certificates are accepted. Do not use this in production! |
|
sechub.productexecutor.pds.adapter.resilience.retry.max |
Maximum amount of retries to handle resilience. When not defined or smaller than 0 the default will be: 3 |
|
sechub.productexecutor.pds.adapter.resilience.retry.wait.milliseconds |
Amount of milliseconds the PDS adapter shall wait before doing a next retry to handle resilience. When not defined or smaller than 1 the default will be: 10000 |
|
pds.config.productidentifier |
Contains the product identifier, so PDS knows which part is to call on it's side. |
|
pds.scan.target.type |
Contains the target type (depending on scan type) and will be just an additional information for PDS from SecHub. |
|
pds.config.use.sechub.storage |
When 'true' the SecHub storage will be reused by the PDS server. In this case SecHub will not upload job data to PDS. But it's crucial to have the same root storage setup on the PDS server side (e.g. same s3 bucket for S3 storage, or same NFS base for shared volumes). When not 'true' or not defined, PDS will use its own storage locations |
|
pds.config.use.sechub.mappings |
Contains a comma separated list of mappping ids. Each defined mapping will be fetched from SecHub DB as JSON and sent as job parameter with the mapping id as name to the PDS. |
|
pds.config.sechub.storage.path |
This contains the sechub storage location when sechub storage shall be used. So PDS knows location - in combination with sechub job UUID reuse is possible |
|
pds.config.filefilter.includes |
This contains a comma separated list of path patterns for file includes. These patterns can contain wildcards. Matching will be done case insensitive! Every file which is matched by one of the patterns will be included - except those which are explicitly excluded. When nothing is defined, then every content is accepted for include. For example: '*.go,*.html, test1.txt' would include every Go file, every HTML file and files named 'test1.txt'. |
|
pds.config.script.trustall.certificates.enabled |
When 'true' the PDS adapter script used by the job will have the information and can use this information when it comes to remote operations. |
|
pds.config.supported.datatypes |
Can be SOURCE, BINARY, NONE or a combination as a comma separated list. This data should normally not be defined via a default value of an optional PDS configuration parameter. |
|
pds.config.jobstorage.read.resilience.retries.max |
Defines the maximum amount of retries done when a job storage read access is failing |
|
pds.config.jobstorage.read.resilience.retry.wait.seconds |
Defines the time to wait in seconds before the next retry is done (when it comes to storage READ problems) |
|
pds.config.product.timeout.minutes |
Maximum allowed time in minutes, before a product will time out - this means that the launcher script is automatically canceled by PDS |
|
pds.config.filefilter.excludes |
This contains a comma separated list of path patterns for file excludes. These patterns can contain wildcards. Matching will be done case insensitive! When empty, then nothing will be excluded. The exclude operation will be done AFTER the include file filtering. For example: '*.go,*.html, test1.txt' would exclude every Go file, every HTML file and files named 'test1.txt'. |
|
pds.scan.target.url |
This contains the target URL for the current scan (i.e. webscan). Will not be set in all scan types. E.g. for a code scan this environment variable will not be available |
|
pds.debug.enabled |
When 'true', the PDS instance will show up some debug information on scan time. The output level of debugging information differs on PDS solutions/launcher scripts. |
|
pds.wrapper.remote.debugging.enabled |
Additional information will be always sent to launcher scripts. Interesting to debug wrapper applications remote. |
|
pds.add.scriptlog.to.pdslog.enabled |
When 'true', the PDS instance will add the complete log output from launcher script (and wrapper calls) to PDS log after the PDS launcher script has finished. |
|
pds.scan.configuration |
This contains the SecHub configuration as JSON object (but reduced to current scan type, so e.g. a web scan will have no code scan configuration data available |
|
pds.config.cancel.event.checkinterval.milliseconds |
This is the maximum time the launcher script process will be kept alive after a cancellation event is sent. This gives the launcher script process a chance to recognize the cancel event and do some final cancel parts and exit gracefully. |
|
pds.config.cancel.maximum.waittime.seconds |
The time in seconds PDS will check again if the launcher script process is alive or not when the process shall be canceled. When nothing defined, the default value is:0. If the value is 0 the process will be terminated without waiting. |
|
pds.mocking.disabled |
When 'true' any PDS adapter call will use real PDS adapter and not a mocked variant. |
|
pds.config.template.metadata.list |
Contains a list of template meta data entries (json). |
|
2.6.2.2. Checkmarx
2.6.2.2.1. Mapping teams and presets for new projects
When a user starts a scan and a checkmarx project does not already exist, it will be created.
In some cases, however, it should not be created with the default Checkmarx "preset" but a dedicated one. And when creating many projects we do not want to assign all other presetIds manually to the project (a preset is something like a profile in Checkmarx where scope of scan can be defined at project level).
Also there should be an automated assignment to dedicated teams when the project is newly created.
This can be done by name pattern providers checkmarx.newproject.presetid.mapping and checkmarx.newproject.teamid.mapping
as shown in following example:
An example parameter configuration:
Define mapping for key checkmarx.newproject.presetid.mapping
{
        "entries": [
            {
                "pattern": "my-java-project-.*",
                "replacement": "100021",
                "comment":"java projects"
            },
            {
                "pattern": "a-go-project-.*",
                "replacement": "100031",
                "comment":"go projects"
            },
            {
                "pattern": ".*",
                "replacement": "100001",
                "comment":"others"
            }
        ]
    }
}
Define mapping for key checkmarx.newproject.teamid.mapping
{
    "entries": [
            {
                "pattern": "my-java-project-.*",
                "replacement": "1",
                "comment":"team id for java projects"
            },
            {
                "pattern": "a-go-project-.*",
                "replacement": "2",
                "comment":"team id for go projects"
            },
            {
                "pattern": ".*",
                "replacement": "3",
                "comment":"team id for other projects"
            }
        ]
}
On lazy project creation time, depending on project name in sechub, after checkmarx project creation the project will automatically be assigned to the pattern specific presetId.
For example:
-
project named in SecHub with
my-java-project-marvelous1will have preset id100021and teamId1. -
project named in SecHub with
a-go-project-super-cliwill have preset id100031and teamId2. -
project named in SecHub with
something-else`will have preset id `100001and teamId3
|
First matching part will be used! So ordering is important! |
2.6.2.2.2. How to obtain preset id
Unfortunately the preset ID is necessary for REST calls, but not visible at Checkmarx UI.
You can either directly access the DB or inspect the web page by web tools in you browser (e.g. enable network monitoring and change preset id at UI…)
2.6.2.2.3. How to obtain team id
Unfortunately the team ID is necessary for REST calls, but not visible at Checkmarx UI.
You can either directly access the DB or inspect the web page by web tools in you browser (e.g. enable network monitoring and change team at UI…)
2.6.3. Examples
| As long as there is no dedicated Web UI for administration we use the Developer Admin UI for example screenshots: |
For every example you have either to create a new executor configuration or edit an an existing one.
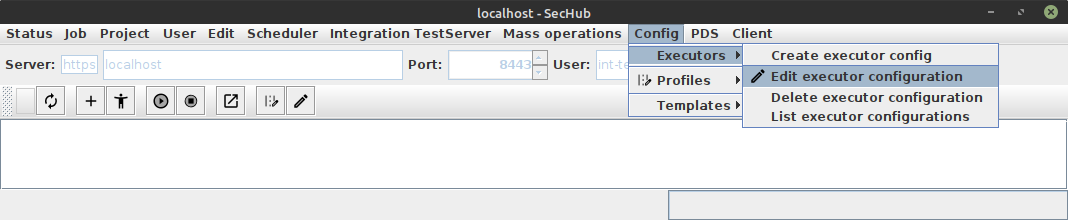
To edit an existing one, select main menu entry "Edit executor configuration" as shown in next figure:
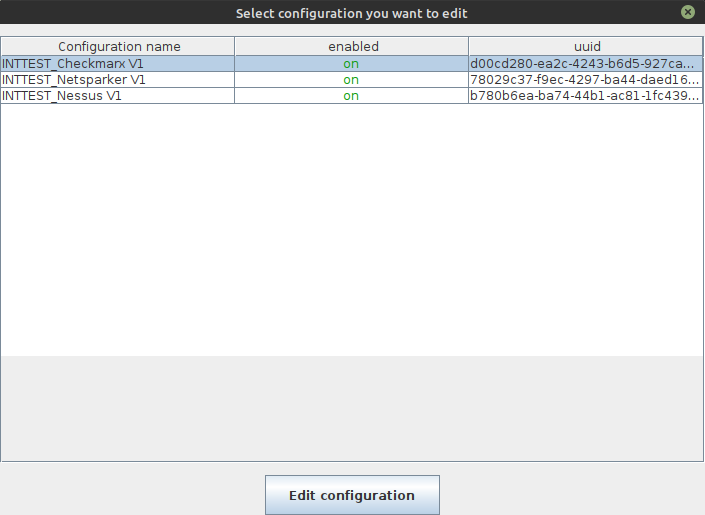
This will result in a selection dialog.
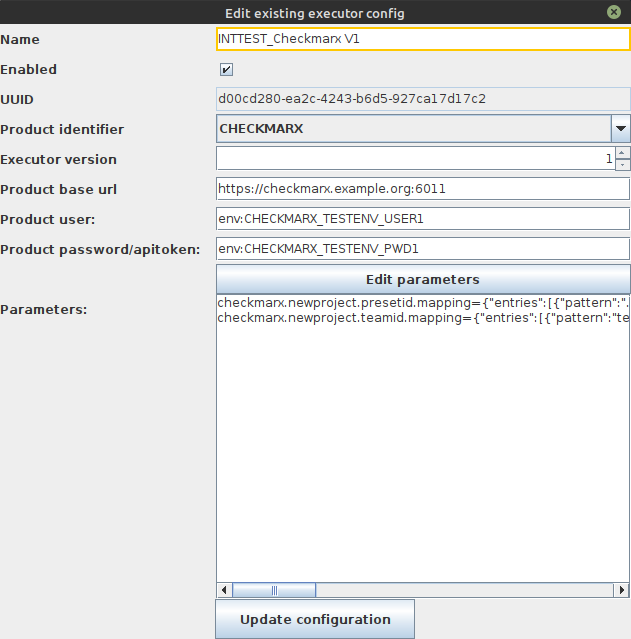
2.6.3.1. Checkmarx configuration
At the configuration editor dialog you can change the data structure. Parameters are inside a simple text field. But there exists also a button "Edit parameters".
|
If you edit directly inside the |
When you press the "Edit parameters" button, a dedicated parameter editor will appear:
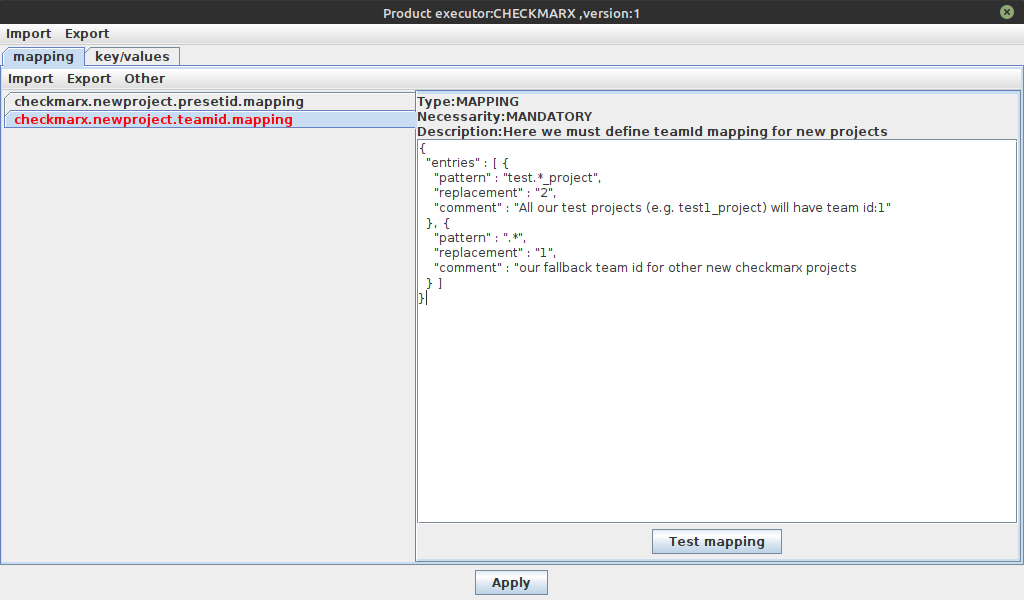
On last figure the type, the necessarity and a short description of the parameters are shown above the text component. This makes it easier to configure values.
At the mapping tab pane you can edit the JSON data. With "Test mapping" button you can also check if the naming pattern are correct and the expected values are resulting.
For the "normal" key value pairs we got the "key/values" tab pane. Here the content is normally
only simple text. For example checkmarx.fullscan.always could contain
like "true" or "false" or simply nothing.
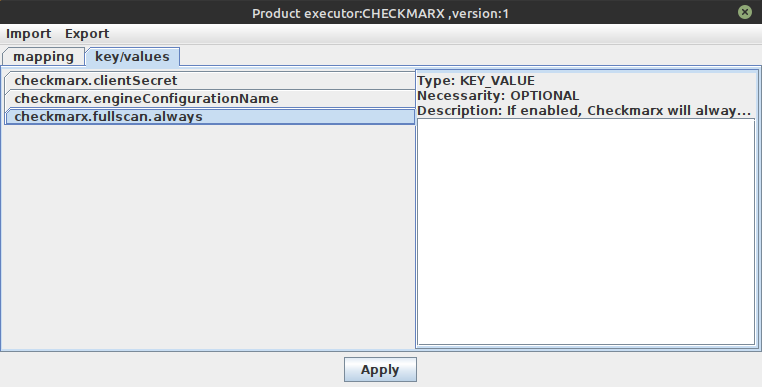
After pressing the Apply button the changed data is set inside executor configuration in correct
format.
2.6.3.2. PDS code scan configuration
Here we got an example for a configuration with selected product identifier PDS_CODESCAN:

The pds.config.productidentifier which is an mandatory value is marked red because it must be
sent to PDS server to identify which product shall be used on the other side.
Optional, but wellknown PDS key value pairs are shown in black - the parameters example.key1 and
example.key2 are marked yellow. Reason: Those keys are unknown by
SecHub and so normally custom parameters.
2.6.3.3. Sereco configuration
Sereco is the only product which needs no configuration at all, because it is an embedded "product".
It also needs no profile setup or something else - as long as there is no other reporting product
available/configured for a SecHub job, an automated fallback will always call Sereco at the end to ensure a report
result is created.
But Sereco is the one and only exception!
2.7. Scan configuration
Sometimes it is necessary to provide special scan configuration setup, e.g. when initializing scan operations at server side.
This can be done by a special scan configuration which is defined as JSON.
Please don’t be confused this configuration with SecHub configuration which is always on client side.
| The scan configuration feature was established before the runtime configuration by profiles and executor configurations was introduced. It is a global configuration for scanning. |
2.7.1. General
2.7.1.1. Name pattern ID providers
Currently only namePatternIdProviders are provided, which contain an id and mappings from name patterns
to identifiers. By this very generic approach dedicated adapters can fetch identifiers for specific name setups.
2.7.2. Mapping
Scan configuration can be changed by SecHub mapping - look at mapping for more information.
Just use the provider ID as mapping ID.
|
3. Security Products
|
Only setup those products you intend to use. See execution profiles and executor configurations |
3.1. PDS
3.1.1. General
The PDS adapter communicates with the PDS instances which delegate to the underlying security products.
Via PDS every security product, even simple CLI tools, can be easily integrated into SecHub.
For more information about the PDS look into Product delegation server documentation.
|
3.1.2. Enabling PDS encryption
In order to enable encryption for a PDS follow these steps:
-
Create an encryption key
Create a random 16- (AES_GCM_SIV_128) or 32-character string (AES_GCM_SIV_256) <string> andecho -n '<string>' | base64
Example:echo -n 'Example Example Example Example ' | base64 -
Set these environment variables for your PDS solution
(For Kubernetes you can do this via the PDS solution’s Helm chart; look for "encryption" in the values.yaml)-
PDS_ENCRYPTION_ALGORITHM - possible values: "NONE", "AES_GCM_SIV_128" or "AES_GCM_SIV_256"
Example:export PDS_ENCRYPTION_ALGORITHM="AES_GCM_SIV_256" -
PDS_ENCRYPTION_SECRET_KEY - Take value from step 1
Example:export PDS_ENCRYPTION_SECRET_KEY='RXhhbXBsZSBFeGFtcGxlIEV4YW1wbGUgRXhhbXBsZSA='
-
-
Start the PDS solution / deploy in Kubernetes
-
Verify: Check the logs.
|
If you deploy with a new encryption key while jobs are running, these jobs cannot be processed any more. So you should stop the SecHub server’s scheduler so the PDS solution is idle before enabling/changing PDS encryption. |
| To disable encryption set the algorithm to "NONE". |
3.2. PDS solutions
There are ready-to-use PDS implementations available - we call them "PDS solutions".
Every PDS solution should work out of the box and provides the possibility to start in following three flavors:
-
Helm charts (Kubernetes)
-
Docker (single instance)
-
Docker compose (cluster)
The next sub chapters list the current implementations:
| The list is growing permanently. Please check https://github.com/mercedes-benz/sechub/tree/develop/sechub-pds-solutions/ for all provided PDS solutions. |
3.2.1. GoSec
The PDS integration of GoSec (SAST) can be found at https://github.com/mercedes-benz/sechub/tree/develop/sechub-pds-solutions/gosec
3.2.2. Multi
This solution does integrate multiple SAST tools:
3.2.3. OWASP ZAP (DAST)
This solution does integrate the https://www.zaproxy.org/ (web application scanner) - please look at https://github.com/mercedes-benz/sechub/blob/develop/sechub-pds-solutions/owaspzap/
3.2.4. PMD
https://pmd.github.io/ stands normally for quality checks, but it does also provide some security check mechanism. The integration can be found at https://github.com/mercedes-benz/sechub/tree/develop/sechub-pds-solutions/pmd
3.2.5. ScanCode
Implements https://github.com/nexB/scancode-toolkit as a license scan tool: https://github.com/mercedes-benz/sechub/tree/develop/sechub-pds-solutions/scancode
3.3. DEPRECATED: Checkmarx
3.3.1. What does the adapter do?
-
All communication is done by REST API
-
Login
-
Ensure project exists (reuses existing project or creates new one)
-
projectname is SecHub project name
-
teamId Is shared and always CHECKMARX installsetup team id for new projects…
-
-
Upload source code from SecHub upload folder per REST to Checkmarx server
-
Start scan
-
When possible incremental scan is used
-
-
Fetch report as XML
3.3.1.1. What must be done on Checkmarx UI
-
At the moment you have create initial a Checkmarx team which will be used for SecHub scans
-
If users shall have access to Checkmarx UI you must add them to used Checkmarx team (manual)
3.3.1.2. What can be configured for SecHub ?
3.3.1.2.1. Environment
Please look at checkmarx config section.
3.3.1.2.2. Runtime
| Standard properties (like base URL, user id etc.) are currently NOT used from existing product executor configurations but only the environment configuration is used at the moment. |
| Parameter | Type | Description |
|---|---|---|
checkmarx.fullscan.always |
boolean |
When 'true' every scan will be done as a full scan and delta scan is not used. Use this only where a delta scan is not possible/ always rejected by checkmarx. When 'false' or any other value, delta scan feature is used. If a scan fails because checkmarx has detected too many changes there will be a retry with fullscan. If you have permanent problems with delta scanning for a project you should set this option to 'true' in your checkmarx executor configuration. |
3.3.2. Summary
-
Projects are initially created and reused automatically
-
Old scans are NOT automatically deleted
-
Multi tenancy is currently problematic: Same Team ID is always used (will be changed with Issue 58)
| Fix team ID will change in future to provide grouping of results in product(for multi tenancy). |
3.4. DEPRECATED: Netsparker
3.4.1. What does the adapter do?
-
All communication is done by REST API
-
Login
-
To differ between intranet and internet scans adapter will use agent name or given agent group. If a group is defined the group will be used.
-
-
Check website already defined in Netsparker
-
Website identifier is defined by pattern (see info box below)
-
If not defined, create new Netsparker website by given identifier otherwise reuse existing one
-
-
Start scan
-
Create new scan for web page identifier and fetch scan ID
-
Wait for scan being done
-
-
Fetch report as XML
|
Website identifier is created by url root part and port number. For example: https://test.example.com/myapp:8080 will be identified by Using |
3.4.2. What must be done on Netsparker UI
3.4.2.1. Users
-
Users must be manual created at Netsparker UI
-
Users must be added to the Netsparker team used by SecHub
-
If you want to have multi tenancy you have to define website groups (see https://github.com/mercedes-benz/sechub/issues/59 for details)
3.4.3. Summary
-
Websites are initially created and reused automatically
-
Old scans are NOT automatically deleted
| Currently Netsparker adapter will always use ONE team user (admin) to create scans. The current logical structure of Netsparker permissions gives all assigned users access to all scans! Keep this in mind. |
3.5. Nessus
3.5.1. What does the adapter do?
-
All communication is done by REST API
-
Login by username and password
-
Fetch Nessus session token by first REST call
-
Resolve Nessus policy UUID
-
Start Scan
-
Add new scan and resolve Nessus scan id.
As scan name sechub job UUID in cobination with target type (INTRANET, INTERNET) will be used -
wait for scan done
-
-
Fetch report as XML by doing a Nessus scan export
-
Logout
3.5.2. What must be done on Nessus UI
-
define the Nessus policy UUID
3.5.3. Summary
-
At the moment only one Nessus policy UUID is used
-
Every scan has got its own name which starts with SecHub job UUID
-
Old scans are NOT automatically deleted
4. Onboarding
Registration process of new users is done by rest API call, for details
about URL etc. please refer to REST API documentation described at User self registration
|
4.1. What must be done when a new user has registered ?
-
Check user is wellknown and should have access
-
Check user name is valid for your purpose / company.
SecHub will automatically check for uniqueness of user name and email address. -
Accept signup by REST API (or tool)
-
If necessary create accounts in your installed security products.
4.2. What must be done when a new project shall be created ?
-
Create a new project inside SecHub by REST API (or tool)+
-
At least the project owner must be set
-
If you do not define any white list URLs there, no web scans or infrastructure scans can be executed!
Check if requested white list entries are really valid for the project and do not belong to another project or organization.
-
-
Assign users to project
Currently its only possible by administrators to add / remove project members. This will change in future, see https://github.com/mercedes-benz/sechub/issues/60
4.3. What must be done when a user wants to have access to a SecHub project ?
-
As long as https://github.com/mercedes-benz/sechub/issues/60 is not solved, the project owner must request the assignment to a super administrator. Only with permission of project owner the assignment should be done!