1. About
About SecHub
SecHub stands for "Security Hub" and serves as an unified API to scan for various security issues. With SecHub, users don’t need to worry about the specific scanning product used on the server side; they simply configure their desired security goals.
|
The SecHub server alone does NOT provide a security infrastructure but orchestrates different security products/tools. Please check our ready to use security open source tools: PDS solutions for integration with SecHub server. |
It was designed to be very easy to integrate into existing build / contionus integration (CI) pipelines and helps to provide SecDevOps.
|
You can get more documentation from the SecHub web page . The project is hosted at https://github.com/mercedes-benz/sechub |
About documentation
This documentation is part of SecHub.
| Key | Value | Information |
|---|---|---|
LICENSE |
MIT License |
Please look at https://github.com/mercedes-benz/sechub/blob/master/LICENSE |
Documentation version: Client 1.11.0 modified (commit 00b7777) - Build date: 2025-09-01 14:49 (UTCZ)
2. SecHub client
2.1. In a nutshell
The SecHub client program is an executable binary which can be used from command
line or in a build tool of your choice.
It’s very easy to use and you do not have to handle all the REST-API calls by yourself.
| Currently the client only supports basic authentication, but of course always only over https. |
2.2. Download
Download the binary for your operating system where you want to trigger SecHub scanning.
You will have no dependencies, just place the single binary file to a location inside your path variable.
Direct download link to the latest client release: https://mercedes-benz.github.io/sechub/latest/client-download.html For documentation, please look at SecHub web page .
2.3. Supported Platforms
The SecHub Client is available for a number of platforms. A platform is a combination of an operating system and a CPU architecture.
| Name | OS | CPU Architecture | Description |
|---|---|---|---|
darwin-amd64 |
macOS |
AMD and Intel 64-bit |
The macOS client. |
darwin-arm64 |
macOS |
ARM |
Support for recent Macs with ARM architecture. |
linux-386 |
Linux |
AMD and Intel 32-bit |
Universal client for Linux as operating system. Statically linked - no dependencies. Also for older hardware. |
linux-amd64 |
Linux |
AMD and Intel 64-bit |
The Linux client, unless you are using older hardware or an ARM system. Dynamically linked. |
linux-arm |
Linux |
ARM 32-bit |
For ARM 32-bit systems. For example, single board computers such as the Raspberry PIs, older Nvidia Jetson boards and many more. |
linux-arm64 |
Linux |
ARM 64-bit |
For ARM 64-bit systems, such as ARM based servers and some single board computers. Examples include newer models of the Nvidia Jetson series, newer Raspberry PI models, servers from the Marvell ThunderX series and Amazon AWS EC2 A1, T4g, M6g, C6g, and R6g instances. |
windows-386 |
Windows |
AMD and Intel 32-bit |
For older hardware running Windows as operating system. |
windows-amd64 |
Windows |
AMD and Intel 64-bit |
The Windows client, unless you are using older 32-bit hardware. |
In case your platform is not included in the table, you might be able to compile the SecHub Client for your platform. The SecHub Client is written in the Go programming language. Go supports more platforms. For a full list of supported platforms have a look at the Go documentation: Optional environment variables.
2.4. Usage
2.4.1. Show help
sechub help
will print out a simple help of all command line options. At the end you will find a link to the latest config and variable examples.
2.4.2. Actions
2.4.3. Parameter overview for client actions
Here is an overview of the mandatory parameters for each action:
action |
mandatory parameters |
server + user + api token + projectID + configFile |
|
server + user + api token + projectID + configFile |
|
server + user + api token + projectID |
|
server + user + api token + projectID |
|
server + user + api token + projectID |
|
server + user + api token + projectID + jobUUID |
|
server + user + api token + projectID |
|
server + user + api token + projectID |
|
server + user + api token + projectID + (file only if no report file is in current dir) |
|
server + user + apiToken + projectID |
|
server + user + api token + projectID + file |
|
server + user + api token + projectID + file |
|
help |
|
version |
2.4.3.1. scan
This is the recommended scan action: You only have to make one single client call to trigger a scan and get the report.
The client performs these steps for you:
-
create a scan job on the SecHub server
-
upload necessary data (e.g. zipped sourcefiles for source scans)
-
approve the job as ready to start
-
wait until the job is done
-
download the report file
| On "red" (critical or high findings) the SecHub client exits with a non-zero status so your build will break (depends on your build tool). |
For security reasons always pass your API-token via the environment variable SECHUB_APITOKEN.
|
Minimum call syntax
Prerequisite is a configuration file sechub.json in current directory.
See here for details: Configuration file
sechub scan
If you prefer the report in HTML format:sechub -reportformat html scan
|
With -output ${file_or_directory} you can define where to place the report.Can be a directory, a file name or a file path. Default: sechub_report_${your_project}_${jobUUID}.{json|html|spdx} in current directory
|
2.4.3.2. scanAsync
Does scan asynchronous:
-
Identical to action
scanbut does not wait until the job has finished on the SecHub server -
Returns the
SecHubjob UUID of the newly created scan job.
| This can be interesting if you have long running scans and you want have a fast continous integration build - but then you have to manually check the job state, fetch reports and you get no automated build break! |
Minimum call syntax
sechub scanAsync
2.4.3.3. getStatus
Will fetch the job status and return result as json
Minimum call syntax
sechub getStatus
|
Defaults to latest job. You can select the job by providing the wanted job UUID by adding -jobUUID ${jobUUID}This action respects defined label definitions as filter criteria. |
2.4.3.4. getReport
Download the SecHub report. (A result will only exist when the SecHub job has finished)
You can choose the format with -reportformat <format>. Default is json.
Currently supported: json, html, spdx-json(only for license scans). If an unsupported format is provided then json will always be the fallback.
Minimum call syntax
sechub getReport
|
Defaults to latest finished job. You can select the job by providing the wanted job UUID by adding -jobUUID ${jobUUID}This action respects defined label definitions as filter criteria. |
With -output ${file_or_directory} you can define where to place the report.Can be a directory, a file name or a file path. Default: sechub_report_${your_project}_${jobUUID}.{json|html|spdx} in current directory
|
2.4.3.5. listJobs
Lists the last jobs and their state.
Minimum call syntax
sechub listJobs
|
This might be useful for an overview or when you want to see your project’s scan job queue or to find out the job UUID of a certain job. This action respects defined label definitions as filter criteria. |
2.4.3.6. cancel
Cancels a SecHub scan job.
Minimum call syntax
sechub -jobUUID ${jobUUID} cancel
2.4.3.7. defineFalsePositives
This will define the false positives list of your project.
Default definition file to read from is sechub-false-positives.json - format is same as for markFalsePositives.
The client will compare against the already defined false-positives on the server and
- add missing false-positive definitions
- remove the ones which are not in the definition file
Minimum call syntax
sechub defineFalsePositives
With -file ${file} you can define where to read from.Default: sechub-false-positives.json in current directory
|
| It’s a good idea to add your false-positives definition file in your source code repository. So everybody can easily have an overview about the declared false-positives. |
2.4.3.8. getFalsePositives
This will fetch the false positives list of your project as JSON.
Minimum call syntax
sechub getFalsePositives
With -output ${file_or_directory} you can define where to place the result.Can be a directory, a file name or a file path. Default: sechub-false-positives-${your_project}.json in current directory
|
2.4.3.9. interactiveMarkFalsePositives
Instead of creating a json file to mark false positives, you can also do this interactively:
Go to the project directory containing sechub.json and a report file from a recent scan and run sechub interactiveMarkFalsePositives.
You can select the report file using the -file option of the client. Otherwise the project’s latest report file in the current directory is automatically selected.
For each finding in the reports file, you are prompted: "Add this as false positive?"
Your choices are:
-
yYes - Mark as false positive. You are prompted for an optional comment line which can help to understand later why this has been marked. -
nNo - Do nothing and go to next item. -
sSkip following findings - Finish the marking and add the marked items to the false positives list on the SecHub server. -
cCancel - Quit and upload nothing
| You can download and view your current false positives list with getFalsePositives |
2.4.3.10. interactiveUnmarkFalsePositives
Instead of creating a json file to unmark false positives, you can also do this interactively:
Go to the project directory containing sechub.json and run sechub interactiveUnmarkFalsePositives
SecHub client will download the current false positives list and interactively ask each entry: "Do you want to remove this false positive?"
Your choices are:
-
yYes - Unmark this false positive. -
nNo - Do nothing and go to next item. -
sSkip the rest - End the asking here and remove the marked items from the false positives list on the SecHub server. -
cCancel - Quit and change nothing
2.4.3.11. markFalsePositives
Read your report carefully and decide which of the findings you consider as "false positives" (FP).
Create a json file as described below and start action markFalsePositives.
Minimum call syntax
sechub -file ${json_file} markFalsePositives
Defining false positives is done by declaring false positive information in a JSON file
-
by referencing job results from former SecHub job UUID and the corresponding finding entry (by id) and/or
-
by specifying a project data section where specific patterns that match false positive findings are declared
and post it to the SecHub server REST API.
|
The |
|
The Each entry can be updated or removed by the given |
Example JSON using job results
{
  "apiVersion": "1.0", (1)
  "type": "falsePositiveDataList", (2)
  "jobData": [ (3)
    {
      "jobUUID": "6cfa2ccf-da13-4dee-b529-0225ed9661bd", (4)
      "findingId": 1, (5)
      "comment": "Can be ignored because not in deployment" (6)
    },
    {
      "jobUUID": "6cfa2ccf-da13-4dee-b529-0225ed9661bd",
      "findingId": 15
    }
  ]
}| 1 | apiVersion (mandatory) - API version |
| 2 | type (mandatory) - must be falsePositiveDataList |
| 3 | jobData - List of job data that is used to mark a single finding as a false positive |
| 4 | jobData.jobUUID (mandatory) SecHub Job-UUID of the report where the finding was |
| 5 | jobData.findingId (mandatory) Finding ID which shall be marked as false positive |
| 6 | jobData.comment (optional) A comment describing the reason why this is a false positive |
Example JSON using project data
{
  "apiVersion": "1.0", (1)
  "type": "falsePositiveDataList", (2)
  "projectData": [ (3)
    {
      "id": "unique-id", (4)
      "comment": "It was verified that there is no SQL-injection",
      "webScan": { (5)
          "cweId": 89, (6)
          "urlPattern": "https://*.example.com/rest/products/search?*", (7)
          "methods": [ "GET", "DELETE" ] (8)
      }
    }
  ]
}| 1 | apiVersion (mandatory) - API version |
| 2 | type (mandatory) - must be falsePositiveDataList |
| 3 | projectData - List that can be used to mark more than a single finding as a false positive. Currently only available for web scans. |
| 4 | projectData.id that identifies this entry. If the same id is used again,
the existing false positive entry will be overwritten. The id is also mandatory to unmark this entry. |
| 5 | projectData.webScan (optional) section can be used to define false positive patterns for web scans (DAST). It provides more possibilities to the user than above jobData. |
| 6 | projectData.webScan.cweId is used to mark a certain type of finding as false positive.When handling web scan project data this will be treated as a mandatory field. Please insert here the cweId from the original report. If there was no cweId in the original report, then it must be omitted or set to zero "cweId": 0. |
| 7 | projectData.webScan.urlPattern (mandatory) specifies an URL pattern to identify a false positive.
Asterisks can be used as wildcards e.g. if you have different environments like DEV, INT, PROD or you have variable parts like in API calls or query paramaters https://.example.com/rest//search?*. |
| 8 | projectData.webScan.methods (optional) Can be used to further restrict the false positive matching, to specific request methods protocols, like GET, POST, etc. |
Important information on the wildcard approach in projectData, regarding web scans:
- To be marked as a false positive a finding must match the given cweId and the urlPattern
- Wildcards (*) can be used inside urlPattern.
- Wildcards match anything until the next NON-wildcard character.
- Multiple wildcards can be used in one urlPattern.
- An optional list of (HTTP) methods can be specified to limit the false positive entry to certain methods, e.g if you specify "methods": [ "GET", "DELETE" ] like in the example above that means even if the cweId and the urlPattern are matching, if the finding was found with a POST request it would not be a false positive. When leaving methods out, this false positive entry apply to any method.
- An urlPattern which contains only wildcards (*) is not allowed.
markFalsePositives only adds new false positives.Providing an empty list here does NOT delete the already declared false positives! If you want this, please use defineFalsePositives. |
| See also interactiveMarkFalsePositives for an easy way to declare false positives. |
2.4.3.12. unmarkFalsePositives
Remove formerly defined false positives.
It works similar to markFalsePositives: Just define a JSON file, select the file by the -file argument and start
action unmarkFalsePositives.
Minimum call syntax
sechub -file ${json_file} unmarkFalsePositives
The JSON scheme is identical to markFalsePositives
Mandatory fields for unmarkFalsePositives:
- for jobData: jobUUID and findingId
- for projectData: id
Example JSON with both: jobData and projectData
{
  "apiVersion": "1.0",
  "type": "falsePositiveDataList",
  "jobData": [
    {
      "jobUUID": "6cfa2ccf-da13-4dee-b529-0225ed9661bd",
      "findingId": 1
    }
  ],
  "projectData": [
    {
      "id": "unique-id"
    }
  ]
}| interactiveMarkFalsePositives might be easier to use |
2.4.4. Configuration overview
Basically parameters can be passed to the SecHub client in three ways:
-
commandline options (overrides below)
-
environment variables (overrides config file)
-
configuration file (default
sechub.json)
In below table, there is an overview of what can be defined where.
scope |
cmdline option |
environment variable |
JSON config file |
api token |
|
|
|
append SCM history |
|
|
|
code scan config |
|||
JSON config file |
|
||
fail on red |
|
||
fail on yellow |
|
||
file |
|
||
job uuid |
|
||
label definitions |
|
|
|
max. poll interval |
|
|
|
network timeout |
|
||
output folder or file |
|
||
project id |
|
|
project |
quiet mode |
|
|
|
report format |
|
||
scan for secrets |
|||
server url |
|
|
server |
temporary dir |
|
|
|
trust all certificates |
|
||
user id |
|
|
user |
web scan config |
|||
DEV: debug http traffic |
|
||
DEV: enable debugging |
|
||
DEV: ignore default excludes |
|
||
DEV: initial wait interval |
|
||
DEV: keep temporary files |
|
2.4.5. Commandline Options
-
-addScmHistory
Secrets scan only: Upload SCM directories like.gitfor scanning.
Can also be defined via environment variableSECHUB_ADD_SCM_HISTORY=true. -
-apitoken <string>
The user’s api token - mandatory. Please try to avoid-apitokenparameter for security reasons!!
Use environment variableSECHUB_APITOKENinstead! (see: Environment variables) -
-configfile <filepath>
Path toSecHubJSON config file. Defaults tosechub.jsonin current directory. -
-file <filepath>
Defines file to read from for actions defineFalsePositives, markFalsePositives, interactiveMarkFalsePositives, unmarkFalsePositives -
-jobUUID <string>
SecHubjob uuid. Optional for actions getStatus or getReport -
-label <label definition>
Define a SecHub label for scan or filtering. (Example: "key1=value1") Repeat to define multiple labels. -
-output <path to folder or file>
Where to place reports, false-positive files etc. Can be a directory, a file name or a file path (defaults to current working directory and default file names) -
-project <string>
Unique project id - mandatory, but can also be defined in config file or via environment variable. -
-quiet
Quiet mode - Suppress all informative output. Can also be defined via environment variableSECHUB_QUIET=true.
Only print filenames written to, errors and explicitely requested informations (job-UUID, version, status). -
-reportformat <format>
Output format for reports. Currently supported: [json,html,spdx-json]. If an unsupported format string is provided, "json" will always be the fallback. -
-server <url>
Server url ofSecHubserver to use - e.g. https//example.com:8081. Mandatory, but can also be defined in config file or via environment variable. -
-stop-on-yellow
A yellow traffic light in the report will result in a non-zero return code. -
-tempdir <path to folder>
Temporary files will be placed here. (defaults to current working directory) -
-timeout <seconds>
Timeout for network communication in seconds. (default 120) -
-user <string>
Username - mandatory, but can also be defined in config file or via environment variable. -
-wait <seconds>
Maximum wait time in seconds (default 60). Will be used for periodic status checks when action=scanand for retries of HTTP calls.
2.4.6. Environment variables
You can set some values via environment variables:
-
SECHUB_ADD_SCM_HISTORY
(trueorfalse/ unset) Secrets scan only: Upload SCM directories like.gitfor scanning. (same as-addScmHistoryoption) -
SECHUB_APITOKEN
The SecHub api token forSECHUB_USERID. (same as-apitokenoption) -
SECHUB_FAIL_ON_RED
Fail on critical or high findings (trueorfalse) - Client returns non-zero when set to ´true`. Default:true -
SECHUB_LABELS
Define one or more labels for scan or filtering. The labels will appear in your SecHub report. Separate multiple labels with ",". (see also-labeloption)
Example:export SECHUB_LABELS="key1=test 1,key2=test 2" -
SECHUB_PROJECT
The SecHub project id. (same as-projectoption) -
SECHUB_QUIET
Quiet mode (trueorfalse/ unset) - Suppress all informative output. (same as-quietoption) -
SECHUB_SERVER
The SecHub server url. (same as-serveroption) -
SECHUB_TEMP_DIR
Temporary files will be placed here. Make sure that the folder exists and is writeable. (same as-tempdiroption) -
SECHUB_TRUSTALL
When set totrue, then HTTPS certificate checking will be disabled. May be useful when using self-signed certificates. Please try to avoid this setting for security reasons. -
SECHUB_USERID
The SecHub username. (same as-useroption) -
SECHUB_WAITTIME_DEFAULT
Maximum wait time in seconds (default 60). Will be used for automatic status checks etc. when action=scan. -
SECHUB_WHITELIST_ALL
When set totruethen ignore the default whitelist for source files and add every file. You may want to define excludes in yoursechub.jsonfile. !! Handle with care !!
Settings for debugging/client development:
-
SECHUB_DEBUG
When set totruethen log as much as possible (but not HTTP request contents) -
SECHUB_DEBUG_HTTP
When set totruethen log HTTP request contents. -
SECHUB_IGNORE_DEFAULT_EXCLUDES
When set totruethen default exclude folders{"**/test/**", "**/.git/**", "**/node_modules/**"}will be included for code scan. In this case, you should declare your own exclude list in the config json. -
SECHUB_INITIAL_WAIT_INTERVAL
Initial wait time (floating point number) until SecHub client polls the first time if the report is ready (sechub scan). Meant for local integration tests. -
SECHUB_KEEP_TEMPFILES
When set totruethensourcecode-<projectID>.zipfiles for code scan will not be removed, so you can check, what was uploaded to theSecHubserver.
2.4.7. Proxy support
The environment variables http_proxy, https_proxy and no_proxy (or the uppercase versions thereof) can be set to use a proxy for accessing the SecHub server.
(https_proxy takes precedence over http_proxy for https requests.)
Syntax: [<scheme>://][<username>:<password>@]<proxy host>[:<proxy port>]
The environment values may be either a complete URL or a "host[:port]", in which case the "http" scheme is assumed.
Examples (Linux/Mac):
export http_proxy=http://scott:tiger@proxy.example.org:3128
export http_proxy=http://localhost:3128 (e.g. when using a local CNTLM proxy)
2.4.8. Debugging
For troubleshooting, you can
-
set environment variable
SECHUB_DEBUGtotrue
Now you will see in detail what the client does and also the html calls sent to and received from SecHub server. -
set environment variable
SECHUB_DEBUG_HTTPtotrue
Now you will see the complete HTTP communication including headers.
(basic-auth headers (security) and contents of uploads (binary data) are filtered out) -
set environment variable
SECHUB_KEEP_TEMPFILEStotrue
Nowsourcecode-<projectID>.zipfiles for code scan orbinaries-<projectID>.tarwill not be removed, so you can check, what was uploaded to theSecHubserver.
2.5. SecHub configuration JSON
A SecHub job configuration file must be valid JSON and is defined
at caller side.
It is used by the client and also by rest calls to define SecHub scan jobs and add meta data.
| Some minor parts are client specific and must be handled by direct REST calls in a special way or do just not exist. But this is mentioned inside this documentation |
The individual components in the JSON are documented below:
2.5.1. API version
apiVersion must be defined (so mandatory). Currently only 1.0 is valid.
2.5.2. Server
server defines the url of your SecHub server.
Information can be used by client implementations.
| This is an optional parameter only which is only interesting for the client to pass the URL. Every REST call contains the server URL already. |
2.5.3. Project
project defines the project id within SecHub. Information can be used by
client implementations.
| When using project id related REST calls, you do not need the project id inside the configuration. |
2.5.4. Code scan
codeScan defines the settings for code scans.
2.5.4.1. Upload source files from file system
This section applies only to the SecHub client.
All source code files inside the defined folders will be automatically zipped and uploaded by the SecHub client
to the SecHub server for analysis.
Paths must be defined relative to caller location - for example on a Jenkins Build Server this is usually the root folder of your repository.
|
Please do NOT use We do NOT recommend using absolute paths but always relative paths! |
There are two ways to define source code uploads for the SecHub client:
2.5.4.1.1. Using data section
Define the files and folders in a data section and reference it inside the codeScan.
This becomes useful e.g. if the same sources are used by different scan types.
Example sechub.json using data section
{
  "apiVersion": "1.0",
  "codeScan": { (1)
    "use": [
      "gamechanger-sources"
    ]
  },
  "data": {
    "sources": [ (2)
      {
        "name": "gamechanger-sources",
        "fileSystem": { (3)
          "folders": [ (4)
            "gamechanger-android/src/main/java",
            "gamechanger-server/src/main/java"
          ]
        },
        "excludes": [ (5)
          "**/mytestcode/**",
          "*.config"
        ],
        "additionalFilenameExtensions": [ (6)
          ".cplusplus",
          ".py9"
        ]
      }
    ]
  }
}| 1 | Define code scan |
| 2 | Upload source code (in contrast to binary uploads) |
| 3 | fileSystem - means uploading sources from local filesystem to SecHub server |
| 4 | Upload will contain sources from gamechanger-android/src/main/java and gamechanger-server/src/main/java and their sub folders |
| 5 | Exclude directories (optional), the ANT fileset pattern notation is supported.
|
| 6 | The SecHub client only adds "well known" sources into the upload zip file.
This reduces the upload size and the scan duration. (E.g. a codescan for a JPEG image would not make sense…) In the SecHub client documentation you will find a list of the default file endings. Here we also add ".cplusplus" and ".py9" as additional accepted source file extensions. |
2.5.4.1.2. fileSystem inside the codeScan section (deprecated)
Define a fileSystem child entry inside the codeScan section for code scanning.
|
This option is deprecated but still supported. Please consider using the data section as described above as it provides more flexibility.
|
Example sechub.json using fileSystem inside the codeScan section (results in same upload as in above example):
{
  "apiVersion": "1.0",
  "codeScan": {
    "fileSystem": {
      "folders": [
        "gamechanger-android/src/main/java",
        "gamechanger-server/src/main/java"
      ]
    },
    "excludes": [
      "**/mytestcode/**",
      "*.config"
    ],
    "additionalFilenameExtensions": [
      ".cplusplus",
      ".py9"
    ]
  }
}
2.5.5. IaC scan
iacScan defines "Infrastructure as Code" scanning.
|
The difference to
|
|
Only source code data sections are allowed for |
2.5.5.1. Example IaC scan
{
  "apiVersion": "1.0",
  "data": {
    "sources": [
      {
        "name": "iac", (1)
        "fileSystem": {
          "folders": ["./cloud-setup", "./deployment/" ] (2)
        }
      }
    ]
  },
  "iacScan": {
    "use": [ "iac" ] (3)
  }
}2.5.6. Infrastructure scan
infraScan (optional) defines the infrastructure scan settings.
|
This setup is used to penetrate an existing IT infrastructure at runtime. Those scans try to detect and exploit CVEs - very similar to a real attacker. Executing such a scan can lead to DoS (denial of service), corrupted data, hanging systems and more. This means infrastructure scans shall only be executed on appropriate test environments (which can be thrown away…) - and never on production systems! |
2.5.6.1. Security setup
2.5.6.1.1. SecHub infrastracture side
The behavior of SecHub must be accepted by SecHub host environment: Infrastructure scans looks like a hacker has taken over the system and is using it to attack the target.
Means SecHub operators must define their environment in a way which makes it clear that this acceptable.
2.5.6.1.2. Test application side
Because the scan behaves like an attacker, existing security solutions could prevent SecHub from scanning - e.g. your firewall /intrusion detection system would detect massive port scans and prevent further access.
If you want your infrastructure to be scanned by SecHub you have to provide the technical possibilities for SecHub - e.g. configure your firewall for the test environment and let SecHub through.
2.5.6.2. URIs
Use uris element to define a string array containing URIs you want to scan.
As in web scans (DAST), the URI must be whitelisted inside the project.
2.5.6.2.1. Example infrascan one URI
{
  "apiVersion": "1.0",
  "infraScan": { (1)
    "uris": [ (2)
      "https://www.gamechanger.example.org/"
    ]
  }
}| 1 | Define infrastructure scan |
| 2 | The URI s to scan. Every URI listed here must be white listed in SecHub project. |
2.5.6.3. IPs
Use ips element to define a string array containing IPs you want to scan.
2.5.6.3.1. Example infrascan one IP
{
  "apiVersion": "1.0",
  "infraScan": { (1)
    "ips": [ (2)
      "127.0.0.1"
    ]
  }
}| 1 | Define infrastructure scan |
| 2 | The IP s to scan. Every IP listed here must be white listed in SecHub project.
The given example with 127.0.0.1 is just an example and will not work because scanners do not scan themselves. |
2.5.7. License scan
licenseScan defines the settings for license scans.
2.5.7.1. Example binary license scan
{
  "apiVersion" : "1.0",
  "data" : {
    "binaries" : [ {
      "name" : "firmware-images",(1)
      "fileSystem" : {
        "folders" : [ "gamechanger-firmware/images" ]
      }
    } ]
  },
  "licenseScan" : {
    "use" : [ "firmware-images"] (2)
  }
}2.5.7.2. Example source license scan
{
  "apiVersion" : "1.0",
  "data" : {
    "sources" : [ {
      "name" : "firmware-sources", (1)
      "fileSystem" : {
        "folders" : [ "gamechanger-firmware/src" ]
      }
    } ]
  },
  "licenseScan" : {
    "use" : [ "firmware-sources"] (2)
  }
}2.5.7.3. Example source licence scan with sources code scan combined
{
  "apiVersion" : "1.0",
  "data" : {
    "sources" : [ {
      "name" : "firmware-sources", (1)
      "fileSystem" : {
        "folders" : [ "gamechanger-firmware/src" ]
      }
    } ]
  },
  "licenseScan" : {
    "use" : [ "firmware-sources"] (2)
  },

  "codeScan" : {
    "use" : [ "firmware-sources"] (3)
  }
}2.5.8. Secret scan
secretScan defines the settings for scanning for secrets in your source code.
The SecHub client automatically adds every file of the defined source directories. (Not only known programming language file extensions like with codeScan)
|
SecHub Client: With the -addScmHistory option SCM directories like .git are also uploaded because secrets could be in the SCM history of previous commits.
|
2.5.8.1. Example source secret scan
{
  "apiVersion": "1.0",
  "data": {
    "sources": [
      {
        "name": "gamechanger-source", (1)
        "fileSystem": {
          "folders": [ "." ] (2)
        }
      }
    ]
  },
  "secretScan": {
    "use": [ "gamechanger-source" ] (3)
  }
}2.5.8.2. Example binary secret scan
{
  "apiVersion" : "1.0",
  "data" : {
    "binaries" : [ {
      "name" : "firmware-images",(1)
      "fileSystem" : {
        "folders" : [ "gamechanger-firmware/images" ]
      }
    } ]
  },
  "secretScan" : {
    "use" : [ "firmware-images"] (2)
  }
}2.5.8.3. Example source secret scan combined with code scan
{
  "apiVersion" : "1.0",
  "data" : {
    "sources" : [
      {
        "name" : "gamechanger-source", (1)
        "fileSystem" : {
          "folders" : [ "."  ] (2)
        }
      }
    ]
  },
  "secretScan" : {
    "use" : [ "gamechanger-source"] (3)
  },
  "codeScan" : {
    "use" : [ "gamechanger-source"] (4)
  }
}2.5.9. Web scan
webScan defines the settings for web scans (DAST).
2.5.9.1. URL
Use the url element to define a URL you want to scan.
| The URL must be whitelisted in your project. Otherwise it will be rejected. So you are not able to start scanning foreign domains and do accidently attack them… |
|
This setup is used to penetrate an existing web application at runtime. Those scans change application data, do fuzzing and try to break into the application, similar to a real attacker. This means web scans (DAST) shall only be executed on appropriate test environments - and normally not on production systems! |
2.5.9.1.1. Example anonymous
{
  "apiVersion": "1.0",
  "webScan": { (1)
    "url": "https://www.gamechanger.example.org", (2)
    "includes": [ (3)
      "/special/include",
      "/special/include/<*>",
      "<*>/special/<*>/include/<*>",
      "<*>/special/include/<*>",
      "special/include/<*>",
      "special/include",
      "special/include/"
    ],
    "excludes": [ (4)
      "/en/contact",
      "/en/contacts/<*>",
      "<*>/en/<*>/contacts/<*>",
      "<*>/en/contacts/<*>",
      "en/contacts/<*>",
      "en/contacts",
      "en/contacts/"
    ],
    "maxScanDuration": { (5)
      "duration": 1,
      "unit": "hour" (6)
  }
  }
}| 1 | Define web scan |
| 2 | The URL to scan. This URL must be whitelisted in SecHub project. Normally without a slash / at the end. |
| 3 | Optional: Define includes, if you have a special path that is linked nowhere,
so the scanner can not detect it automatically while crawling the application. You can use wildcards by using the symbol <*> like in the example above.
To make the scan work the target URL will always be implicitly included with "https://www.gamechanger.example.org<*>" if no includes are specified. If includes are specified the scan is limited to these includes.
In case you need to include certain parts of your application the scanner cannot detect,
but you want everything else to be scanned as well, please specify a wildcard as include explicitly: "includes": [ "/hidden/from/crawler/", "/<*>" ].
|
| 4 | Optional: Define excludes, if you have a special path you want to exclude, from the scan. You can use excludes the same way you can use the includes. Excludes do always overwrite includes if the provided patterns for includes and excludes do have intersections. |
| 5 | Optional: Define the maximum duration the scan can take. Scanning a "large" web page/application can take several hours or even days. This option ensures the scan will only run for a limited time. |
| 6 | Define the unit of time.
The unit can be: millisecond, second, minute, hour, day. |
|
Includes are a different from excludes looking at wildcards, because in includes they might not be resolved properly, if the pages behind the wildcards cannot be detected by a web crawler. If you only want to scan a specific part of your application e.g only the customers section |
2.5.9.2. Login
A web scan does work much better if it has got access to all content - so a login is necessary most time. If you do not define a login configuration your web scan will be done only as anonymous user.
|
Providing login will enable web scanner to execute ALL possible actions! An example: Your test application has a Web UI for sending SMS which can be triggered by an user. Then a web scan can trigger those operations as well! If you do this inside an environment where a real SMS provider is connected, this could result into mass SMS and also in a bigger invoice from your SMS provider - so be careful! |
2.5.9.2.1. Options
SecHub provides you with 2 options for login:
-
basic authentication
-
form based login
-
script based
-
|
When a web scan product (or its adapter) does not support your wanted options you will have a failure at execution time! |
2.5.9.2.2. Example basic authentication
{
    "apiVersion": "1.0",
    "webScan": {
        "url": "https://productfailure.demo.example.org",
        "login": {
            "url": "https://productfailure.demo.example.org/login",(1)
            "basic": {(2)
                "user": "{{ .LOGIN_USER }}",
                "password": "{{ .LOGIN_PWD }}",
                "realm": "{{ .LOGIN_REALM }}" (3)
            }
        }
    }
}| 1 | URL for web login |
| 2 | Basic authentication, needs user id/name and password. |
| 3 | Optional: You can set the realm used for basic authentication. But normally this is not necessary. |
2.5.9.2.3. Example client certificate authentication
{
  "apiVersion" : "1.0",
  "project" : "example_project",
  "data" : {
    "sources" : [ {
      "name" : "client-certificate-file-reference", (1)
      "fileSystem" : {
        "files" : [ "path/to/backend-cert.p12" ]
      }
    } ]
  },
  "webScan" : {
    "url" : "https://productfailure.demo.example.org",
    "clientCertificate" : {
      "password" : "{{ .CERT_PASSWORD }}", (2)
      "use" : [ "client-certificate-file-reference" ] (3)
    }
  }
}| 1 | name of the source data configuration: "client-certificate-file-reference". Please use single files only instead of folders to specify the client certificate. If you want to combine this with an openAPI definition that must be uploaded for the scan as well, please refer to this example. |
| 2 | Optional: If the client certificate is password protected, the password can be specified here.
Using our SecHub GO client you can make use of the GO templating engine.
Like in the example above the you can provide an environment variable containing the password instead of writing the plaintext password in the JSON configuration file.
In the example above the SecHub GO client will substitute the value of "{{ .CERT_PASSWORD }}" with the value of the environment variable CERT_PASSWORD. |
| 3 | web scan uses the referenced data configuration "client-certificate-file-reference", to obtain the client certificate file. |
2.5.9.2.4. Example authentication via webscan template
This can be used to handle complex authentication steps that can be handled in a template e.g. with a login script. The template must be assigned to the project. Any other part of the webscan configuration can be combined with the template section of the webscan configuration, e.g. TOTP or avoiding logout.
{
  "apiVersion" : "1.0",
  "webScan" : {
    "url" : "https://productfailure.demo.example.org",
    "login" : {

      "templateData" : { (1)
        "variables" : {  (2)
          "username" : "the-user",
          "password" : "the-password"
        }
      },

      "totp" : {
        "seed" : "example-seed"
      }
    }
  }
}| 1 | templateData contains all the data relevant to make use of the template. The template itself must be configured and saved and managed on the SecHub server.
Please have a look at the concept_templates_and_assets.adoc for more details on how the templates work. |
| 2 | variables for the template that shall be used. These are defined by the template, in this case this template for the webscan requires a username and a password.
Only if users know which template is assigned to their project, they will be able to configure the template correctly. |
2.5.9.2.5. Example logout configuration
This is onyl relevant if scanning a frontend, since this logout specification tries to find certain HTML elements. When scanning a web API this section can be omitted. For URLs to exclude from the scan see [sechub-config-example-webscan-anonymous].
{
  "apiVersion": "1.0",
  "webScan": {
    "url": "https://example.org",
    "login": {
      "url": "https://example.org/login"
    },
    "logout": { (1)
      "xpath": "//*[@id=\"logoutButton\"]", (2)
      "htmlElement": "button" (3)
    }
  }
}| 1 | logout section to avoid logout during scan. A button or any other HTML element can be specified here,
to avoid a logout during the scan. To specify an URL to avoid during scan please use [sechub-config-example-webscan-anonymous] |
| 2 | xpath to locate the HTML element that shall be avoided during the scan. In the example the xpath points to a button. |
| 3 | htmlElement to locate the HTML element that shall be avoided during the scan. In this example the logout is done via a button. The button will be found by the xpath above, but the element type is still required, to avoid interaction with this element successfully. |
2.5.9.2.6. Example form based login by script
This example currently only works with the Netsparker DAST module. We deprecated the Netsparker integration because it is not developed any further from our side. We use and develop the Zaproxy integration. As soon as this feature is available for our actively maintained Zaproxy DAST module, we will remove this warning. If you host SecHub yourself with a Netsparker module, this does not affect you. You can use this configuration as before.
|
{
  "apiVersion" : "1.0",
  "webScan" : {
    "url" : "https://productfailure.demo.example.org",
    "login" : {
      "url" : "https://productfailure.demo.example.org/login", (1)
      "form" : { (2)
        "script" : { (3)
          "pages" : [ (4)
                  {
                    "actions" : [ (5)
                            {
                              "type" : "username", (6)
                              "selector" : "#example_login_userid", (7)
                              "value" : "{{ .LOGIN_USER }}" (8)
                            },
                            {
                              "type" : "password",
                              "selector" : "#example_login_pwd",
                              "value" : "{{ .LOGIN_PWD }}"
                            },
                            {
                              "type" : "click",
                              "selector" : "#next",
                              "description" : "Click to go to next page" (9)
                            }
                         ]
                  },
                  {
                    "actions" : [
                            {
                              "type" : "input",
                              "selector" : "#example_other_inputfield",
                              "value" : "{{ .OTHER_VALUE }}"
                            },
                            {
                              "type" : "wait", (10)
                              "value" : "1",
                              "unit" : "second" (11)
                            },
                            {
                              "type" : "click",
                              "selector" : "#doLogin"
                            }
                    ]
                 }
          ]
        }
      }
    }
  }
}| 1 | URL for web login. |
| 2 | Start of form based login. |
| 3 | Script definition. |
| 4 | Pages section. A page is a visible page. Some logins need more than one page. |
| 5 | The actions which should be executed on each page. |
| 6 | Type of action. Valid types are :
|
| 7 | Selector (CSS) to identify web element. |
| 8 | Value, used by most actions (username|password|input|wait).In this examples you see variables in go template format. This is SecHub client specific.
If you use the REST API directly, you must use real values! |
| 9 | A description can be added to explain an action. |
| 10 | The time the next action will be delayed. |
| 11 | Define the unit of time.
The unit can be: millisecond, second, minute, hour, day. |
username and password are like input but SecHub tries
to hide these information in logs or at UI where possible.
So do NOT use input for credentials!
|
2.5.9.2.7. Example form based login with TOTP
The TOTP configuration is generally never used without any other login mechanism. It is meant to be used as an additional authentication factor. In this example TOTP is used in combination with form based login, which is left out in the example for better readability.
Most of the time it is enough to specify a seed for the TOTP configuration in SecHub.
The optional values validityInSecods, tokenLength and hashAlgorithm have defaults which will be used if nothing is specified.
The defaults are well-known and any authentication provider or application should provide the optional data if it uses anything other than the defaults.
|
{
  "apiVersion" : "1.0",
  "webScan" : {
    "url" : "https://productfailure.demo.example.org",
    "login" : {
      "url" : "https://productfailure.demo.example.org/login",
      "form" : {
        "script" : {
          "pages" : [ {
            "actions" : [ {
              "type" : "username",
              "selector" : "#example_login_userid",
              "value" : "{{ .LOGIN_USER }}"
            }, {
              "type" : "password",
              "selector" : "#example_login_pwd",
              "value" : "{{ .LOGIN_PWD }}"
            }, {
              "type" : "click",
              "selector" : "#next",
              "description" : "Click to go to next page"
            } ]
          } ]
        }
      },
      "totp" : { (1)
        "seed" : "example-seed", (2)
        "validityInSeconds" : 60, (3)
        "tokenLength" : 8, (4)
        "hashAlgorithm" : "HMAC_SHA256", (5)
        "encodingType" : "base64" (6)
      }
    }
  }
}| 1 | Start of TOTP configuration. |
| 2 | The seed is the only mandatory field for the TOTP configuration.
It represents the secret key used to generate TOTP values. |
| 3 | The validityInSecods is an optional field, which represents the maximum amount of seconds a TOTP is valid.
This depends on the authentication provider or the application, providing the seed to the user.
If no specific validityInSecods is provided do not configure this value and SecHub will use the default. |
| 4 | The tokenLength is an optional field, which represents the length of the TOTP the authentication provider or the application expects.
As before, this depends on the authentication provider or the application, providing the seed to the user.
If no specific tokenLength is provided do not configure this value and SecHub will use the default. |
| 5 | The hashAlgorithm is an optional field, representing the hash algorithm, which is used by the authentication provider or the application during the computation of the TOTP.
As before, this depends on the authentication provider or the application, providing the seed to the user.
If no specific hashAlgorithm is provided do not configure this value and SecHub will use the default.The currently available hash algorithms are:
|
| 6 | The encodingType is an optional field, representing the encoding of the mandatory field seed.
SecHub has a default configured if nothing is specified or the encoding type is not known.
The default value is AUTODETECT where SecHub tries to detect the encoding of one of the four other available types.
The currently available encoding types for seed are, which are treated case-insensitive:
|
2.5.9.2.8. Example form based login with Login Verification
The login verification can be configured to verify the login was successful and the DAST module is logged in during the scan.
{
  "apiVersion": "1.0",
  "webScan": {
    "url": "https://productfailure.demo.example.org",
    "login": {
      "url": "https://productfailure.demo.example.org/login",
      "basic": {
        "user": "{{ .LOGIN_USER }}",
        "password": "{{ .LOGIN_PWD }}",
        "realm": "{{ .LOGIN_REALM }}"
      },
      "verification": { (1)
        "url": "https://productfailure.demo.example.org/verify", (2)
        "responseCode": 204 (3)
      }
    }
  }
}| 1 | Start of login verification configuration. (Optional) |
| 2 | The url of a page which can only be visited if the login was successful. (Mandatory) |
| 3 | The response code which is expected when visiting the verification page. (Optional, default is 200) |
2.5.9.2.9. Example OpenAPI scan
{
  "apiVersion" : "1.0",
  "data" : {
    "sources" : [ {
      "name" : "open-api-file-reference", (1)
      "fileSystem" : {
        "files" : [ "gamechanger-webapp/src/main/resources/openapi3.json" ]
      }
    } ]
  },
  "webScan" : {
    "url" : "https://productfailure.demo.example.org",
    "api" : {
      "type" : "openApi", (2)
      "use" : [ "open-api-file-reference" ], (3)
      "apiDefinitionUrl" : "https://productfailure.demo.example.org/api/v1/swagger/?format=openapi" (4)
    }
  }
}| 1 | name of the source data configuration: "open-api-file-reference" |
| 2 | web scan uses "openApi" as API type |
| 3 | web scan uses the referenced data configuration "open-api-file-reference" to obtain the open api configuration file |
| 4 | you can also use apiDefinitionUrl to specify an URL to read the API definition from.
Currently you can combine importing openApi definitions from files and URLs, but most of the time it does not make sense to combine this two options. |
2.5.9.2.10. Example combination of openAPI definition and client certificate authentication
{
  "apiVersion" : "1.0",
  "data" : {
    "sources" : [ {
      "name" : "open-api-file-reference", (1)
      "fileSystem" : {
        "files" : [ "gamechanger-webapp/src/main/resources/openapi3.json" ]
      }
    }, {
      "name" : "client-certificate-file-reference", (2)
      "fileSystem" : {
        "files" : [ "path/to/backend-cert.p12" ]
      }
    } ]
  },
  "webScan" : {
    "url" : "https://productfailure.demo.example.org",
    "api" : {
      "type" : "openApi",
      "apiDefinitionUrl" : "https://productfailure.demo.example.org/api/v1/swagger/?format=openapi",
      "use" : [ "open-api-file-reference" ] (3)
    },
    "clientCertificate" : {
      "password" : "{{ .CERT_PASSWORD }}",
      "use" : [ "client-certificate-file-reference" ] (4)
    }
  }
}| 1 | Data section with files referenced by the openAPI definition. Multiple files (NOT folders) are possible. |
| 2 | Data section with the file referenced by the clientCertificate definition. Only one single file shall be provided here. |
| 3 | Reference to the data section containing files with your openAPI definitions (e.g. swagger.yml or openAPI.json) |
| 4 | Reference to the data section containing file with your client certificate for authentication. |
2.5.9.2.11. Example Header scan
{
  "apiVersion" : "1.0",
  "webScan" : {
    "url" : "https://productfailure.demo.example.org",
    "headers" : [ {
      "name" : "Authorization", (1)
      "value" : "{{ .HEADER_VALUE }}" (2)
    }, {
      "name" : "x-file-size", (3)
      "value" : "123456", (4)
      "onlyForUrls" : [ "https://productfailure.demo.example.org/admin", "https://productfailure.demo.example.org/upload/<*>", "https://productfailure.demo.example.org/<*>/special/" ], (5)
      "sensitive" : false (6)
    } ]
  }
}| 1 | Name of the specified header. Must not be null or empty. |
| 2 | Value of the specified header. Must not be null or empty.
You can use the go template format like above by creating a environment variable like: HEADER_VALUE="Bearer mytoken1234".
This might be useful to load the information via the SecHub client dynamically, if the header value you specify contains credentials. |
| 3 | Name of the second header. You can specify a list of headers the DAST Scanner needs interact with your application. |
| 4 | Value of the second header. Here no go template format is used, since in this example there are no credentials but only file size of an upload. |
| 5 | Optional Parameter: For each header you can specify a list of URLs.
The header this list belongs to, will only be send when accessing one of the URLs on the list.
If you do not specify a list of URLs or the list is empty, the header will be send on each request to every URL.
You can also use wildcards by specifying <*> like in the example above.
Adding a wildcard to the end of an URL, the header will be sent to all sub URLs as well, otherwise it won’t be sent to sub URLs.
Make sure that the header URL combinations are unique. This means do not specify the same header multiple times for the same scope of URLs. |
| 6 | Optional Parameter to handle sensitive header data: If true, the value of this header will be masked inside the SecHub report to avoid leaking the information.
But if the parameter is set to false the value will be shown as is.
The default is true if nothing is specified. |
2.5.9.2.12. Use headers to identify SecHub webscans in application logs
{
  "apiVersion" : "1.0",
  "webScan" : {
    "url" : "https://example.org",
    "headers" : [ {
      "name" : "sechub-webscan",
      "value" : "unique-identifier"
    } ]
  }
}
Custom HTTP headers can be used for a lot of things besides authentication, e.g. to identify the requests of the SecHub webscan inside the target application’s logs.
A custom header with an arbitrary name like sechub-webscan: $UNIQUE_IDENTIFIER_ONLY_KNOWN_TO_THE_PROJECT can be used to distinguish SecHub webscan requests and other potentially malicious requests.
Additionally, the SecHub webscan will contain the x-sechub-dast header containing the SecHub job UUID inside the header value to identify the requests of the scan jobs.
Specifying the header name x-sechub-dast with a custom value inside the JSON scan configuration, will overwrite the default value which is the SecHub jobUUID.
2.5.9.2.13. Example Header scan with value from data section
{
  "apiVersion" : "1.0",
  "data" : {
    "sources" : [ {
      "name" : "header-value-file-reference",
      "fileSystem" : {
        "files" : [ "header_value.txt" ]
      }
    }]
  },
  "webScan" : {
    "url" : "https://productfailure.demo.example.org",
    "headers" : [ {
      "name" : "Authorization", (1)
      "use" : [ "header-value-file-reference" ] (2)
    } ]
  }
}| 1 | Name of the specified header. Must not be null or empty. |
| 2 | Name of the source data configuration: "header-value-file-reference".
Please use single files only instead of folders to specify the header value. Use a separate data section for each header.
This can be used if you want to provide a large header value, which exceeds the maximum size of the sechub.json configuration file.
For each header provide either a value directly (as shown in Example Header scan) or a data section reference via use as shown in this example. |
2.5.10. Data section
With the data section users are able to
-
define binary and source uploads
-
reference the same by muliple scan types in one job
The scan configurations can reference the name data configuration elements by defining the
array attribute "use" with a list of references.
{
  // ..scan definition
  "use" : [ "reference-name-1","reference-name-2", ... ] (1)
}| 1 | the list of referenced data configurations . The referenced names must exist. |
Here are some links to examples which are using data inside their configurations:
The next figure shows an example which presents all possibilities (for simplicity the source and binary configuration arrays do contain only just one entry):
{
  "data": { (1)
    "sources": [
      { (2)
        "name": "reference-name-sources-1", (3)
        "fileSystem": { (4)
          "files": [ (5)
            "somewhere/file1.txt",
            "somewhere/file2.txt"
          ],
          "folders": [ (6)
            "somewhere/subfolder1",
            "somewhere/subfolder2"
          ]
        },
        "excludes": [ (7)
          "**/mytestcode/**",
          "**/documentation/**"
        ],
        "additionalFilenameExtensions": [ (8)
          ".cplusplus",
          ".py9"
        ]
      }
    ],
    "binaries": [
      { (9)
        "name": "reference-name-binaries-1", (3)
        "fileSystem": {
          "files": [ (5)
            "somewhere/file1.dll",
            "somewhere/file2.a"
          ],
          "folders": [ (6)
            "somewhere/bin/subfolder1",
            "somewhere/bin/subfolder2"
          ]
        }
      }
    ]
  }
}| 1 | data: The main element for data configuration. |
| 2 | sources: Inside this array multiple source data definitions can be listed |
| 3 | name: Is a unique name for the data configuration element. The name must
be unique inside the whole SecHub configuration file! Allowed characters are a-z,0-9 and the special characters _ and -. |
| 4 | fileSystem: Describes fileystem parts which are available inside this data configuration element |
| 5 | files: An array containing file paths to use for uploading dedicated files |
| 6 | folders: An array containing folder paths to use for uploading dedicated folders |
| 7 | excludes: Exclude directories (optional) - see code scan
for details. The excludes work for sources and binaries the same way. |
| 8 | additionalFilenameExtensions Introduce additional file name extensions. See code scan
for details about default behaviour for sources. |
| 9 | sources: Inside this array multiple binary data definitions can be listed. |
2.5.10.1. Remote Data
Instead of configuring the file system and uploading local data, it is also possible to define a remote data section to automatically retrieve
the data to be scanned from remote locations.
In a PREPARE phase the PDS prepare will download the data from the remote location and upload it to a shared storage.
From there any other PDS solution can access the data for scanning.
The type is not mandatory, but it is recommended to set it to git or docker to make it clear what type of remote data is being used.
Scan types (codeScan, licenseScan etc.), includes or excludes as well as false positives can be defined as usual.
2.5.10.1.1. Example source remote data scan
{
  "apiVersion" : "1.0",
  "data" : {
    "sources" : [ {
      "name" : "firmware-images",
      "remote" : {
        "location" : "https://path-to-my-git-exmaple/repository.git", (1)
        "type" : "git" (2)
      }
    } ]
  },
  "codeScan" : {
    "use" : [ "firmware-images"]
  }
}| 1 | location: The URL to remote data. (for example a git repository or a docker registry) |
| 2 | type: The type of the remote data. Currently supported are git or docker. |
2.5.10.1.2. Example source remote data scan with credentials
{
  "apiVersion" : "1.0",
  "data" : {
    "sources" : [ {
      "name" : "firmware-images",
      "remote" : {
        "location" : "https://path-to-my-git-exmaple/repository.git", (1)
        "type" : "git", (2)
        "credentials" : {
          "user" : { (3)
            "name" : "my-username", (4)
            "password" : "my-password" (5)
          }
        }
      }
    } ]
  },
  "codeScan" : {
    "use" : [ "firmware-images"]
  }
}| 1 | location: The URL to remote data. (for example a git repository or a docker registry) |
| 2 | type: The type of the remote data. Currently supported are git or docker. |
| 3 | user: Defines user credentials |
| 4 | name: The username to access remote data |
| 5 | password: The API token or password that grant access to remote data |
2.5.10.1.3. Example binaries remote data scan with credentials
{
  "apiVersion" : "1.0",
  "data" : {
    "binaries" : [ {
      "name" : "firmware-images",
      "remote" : {
        "location" : "https://path-to-your-image:tag", (1)
        "type" : "docker", (2)
        "credentials" : {
          "user" : {
            "name" : "my-username",
            "password" : "my-password"
          }
        }
      }
    } ]
  },
  "codeScan" : {
    "use" : [ "firmware-images"]
  }
}| 1 | location: The URL to remote data. (for example a git repository or a docker registry) |
| 2 | type: The type of the remote data. Currently supported are git or docker. |
2.5.11. MetaData
The SecHub configuration file can have optional meta data.
|
The SecHub configuration is stored encrypted in database and access is restricted, even for administrators. But the meta data can be fetched by users of the project or administrators without additional audit logging. Because of this you should never store sensitive information inside the meta data! |
2.5.11.1. Labels
With labels a user is able to add additional information to the scan configuration which end up in the report as key value pairs.
| Using the SecHub client, you can also pass labels via command line or environment variables. |
The next figure shows an example which presents all possibilities (for simplicity other configuration elements are removed).
{
  "metaData": { (1)
    "labels": { (2)
      "Example1": (3)
      "The labels are alphabetically sorted!", (4)
      "Example1.1": "Values can be any text."
    }
  }
}| 1 | metaData: The main element for meta data configuration. It is optional. |
| 2 | labels: Inside this element the user can define labels as key value pairs.
|
| 3 | represents the label key.
|
| 4 | represents the label value.
|
2.5.12. Code scan: accepted source code files
The client will per default only include "wellknown" source files. This is done by inspecting the filename ending. The accepted defaults are shown in next table.
|
All files having file endings not listed here, will be ignored and not uploaded to SecHub server. Except the source data definition is also used for secrets scanning. Then every file is being uploaded. |
| You can also define additional source file endings - see config file example . |
| Language(s) | File extensions |
|---|---|
Apex |
.apex |
ASP (Active Server Pages) |
.asp |
ASP |
.ascx |
Azure |
.bicep |
C/C++ |
.ac |
C#, VB.NET, Visual Basic, VB Script |
.asax |
Certificates for secrets scans |
.crt, |
Cobol |
.cbl |
Docker |
Dockerfile |
Go, Protobuf |
.go |
Groovy |
.groovy |
HTML |
.htm |
Java ecosystem |
.app |
JavaScript |
.handlebars |
Kotlin |
.ftl |
Kubernetes, Helm, Docker-Compose |
.yaml |
Lua |
.lua |
Objective C, Swift |
.m |
Perl |
.pl |
php |
.ctp |
PL/SQL |
.pck |
Python, Django |
.csv |
Ruby |
.erb |
Rust |
.rs |
Scala |
.conf |
Terraform |
.tf |
Typescript/Angular |
.ts |
Others |
.build |
2.5.13. Inject variables into configuration files (For advanced users)
All environment variables are available inside your configuration file in Go template syntax:
{{ .ENV_VARIABLE_NAME }}
For example: When you have defined USED_API_VERSION with value 1.0, you can inject it into a json config file like this:
{
  "apiVersion": "{{ .USED_API_VERSION }}"
}
2.6. Examples
The next subsections contain some SecHub configuration examples.
You can use them as templates for your own files.
First: Define your SecHub environment variables:
export SECHUB_SERVER=https://sechub.example.org
export SECHUB_USERID=alice
export SECHUB_APITOKEN=EXAMPLE4aa82407da7e06bdbEXAMPLE
export SECHUB_PROJECT=myproject| Please replace the example values with your real ones to get them working. |
2.6.1. Start a source code scan
sechub scanwith corresponding 'sechub.json' config file: see source scan example .
2.6.2. Start a web scan
sechub scanwith corresponding 'sechub.json' config file: see web scan example (anonymous)
2.6.3. Start a scan for secrets
sechub scanwith corresponding 'sechub.json' config file: see examples for secret scans
2.6.4. Start an infra scan
sechub scanwith corresponding sechub.json config file: infrastructure scan example .
2.6.5. Mark false positives
2.6.5.1. markFalsePositives
sechub -file mark-fp.json markFalsePositiveswith a corresponding mark-fp.json - see Mark false positives JSON format
2.6.5.2. interactiveMarkFalsePositives
sechub interactiveMarkFalsePositives

/  ___|         | | | |     | |
\ `--.  ___  ___| |_| |_   _| |__
 `--. \/ _ \/ __|  _  | | | | '_ \
/\__/ /  __/ (__| | | | |_| | |_) |
\____/ \___|\___\_| |_/\__,_|_.__/ Client Version 0.29.0-20220401111823

Using latest report file "sechub_report_mytestproject_0a84899f-1305-41e0-a2d5-e7c31d6185fd.json".
------------------------------------------------------------------
1: Side Channel Data Leakage, severity: HIGH
src/main/java/com/example/testapp/invoice/application/InvoiceApplicationService.java, line 651 column 17
        Invoice creditNote = getInvoice(invoiceId).orElseThrow(InvoiceNotFoundException::new);
------------------------------------------------------------------
Add this as false positive? ('y' Yes, 'n' No, 's' Skip following findings, 'c' Cancel) y
Please add a single line comment:
Can be ignored in our case
------------------------------------------------------------------
2: Unsafe Object Binding, severity: MEDIUM
src/main/java/com/example/testapp/api/ServiceOrderController.java, line 33 column 59
    public void saveAttachment(@RequestBody AttachmentDto attachmentDto){
------------------------------------------------------------------
Add this as false positive? ('y' Yes, 'n' No, 's' Skip following findings, 'c' Cancel) n
------------------------------------------------------------------
3: Unsafe Object Binding, severity: MEDIUM
src/main/java/com/example/testapp/api/CouponController.java, line 30 column 78
    public CouponVerifyResponseDto couponVerify(@RequestBody CouponVerifyDto couponVerifyDto) {
------------------------------------------------------------------
Add this as false positive? ('y' Yes, 'n' No, 's' Skip following findings, 'c' Cancel) s
- Successfully uploaded SecHub false-positives list for project "mytestproject" to server.
2.6.6. Unmark false positives
2.6.6.1. unmarkFalsePositives
sechub -file mark-fp.json unmarkFalsePositiveswith a corresponding mark-fp.json - see Unmark false positives JSON format
2.6.6.2. interactiveUnmarkFalsePositives
sechub interactiveUnmarkFalsePositives
 _____           _   _       _
/  ___|         | | | |     | |
\ `--.  ___  ___| |_| |_   _| |__
 `--. \/ _ \/ __|  _  | | | | '_ \
/\__/ /  __/ (__| | | | |_| | |_) |
\____/ \___|\___\_| |_/\__,_|_.__/ Client Version 0.29.0-20220401111823

- Fetching false-positives list for project "mytestproject".
------------------------------------------------------------------
Side Channel Data Leakage, codeScan severity: HIGH
  Origin: Finding ID 1 in job 0a84899f-1305-41e0-a2d5-e7c31d6185fd
  File: src/main/java/com/example/testapp/invoice/application/InvoiceApplicationService.java
  Code:         Invoice creditNote = getInvoice(invoiceId).orElseThrow(InvoiceNotFoundException::new);
(Added by testuser at 2020-08-20 12:43:03; comment: "Can be ignored in our case")
------------------------------------------------------------------
Do you want to remove this false positive? ('y' Yes, 'n' No, 's' Skip the rest, 'c' Cancel) y
------------------------------------------------------------------
Side Channel Data Leakage, codeScan severity: HIGH
  Origin: Finding ID 2 in job 0c86134c-2305-41e0-a2d5-e7c31df45d15
  File: src/main/java/com/mercedesbenz/otr/invoice/application/ApplicationService.java
  Code:         Invoice invoice = getInvoice(invoiceId).orElseThrow(InvoiceNotFoundException::new);
(Added by testuser at 2020-08-20 12:43:03; comment: "Another explanation example")
------------------------------------------------------------------
Do you want to remove this false positive? ('y' Yes, 'n' No, 's' Skip the rest, 'c' Cancel) s
Applying false-positives to be removed for project "vpc_cn":
- JobUUID 0a84899f-1305-41e0-a2d5-e7c31d6185fd: finding #1
Transfer completed
3. Reporting
This chapter describes the different SecHub report types and how to read them.
Job reports do only contain information of exact one scan job done by SecHub.
3.1. Job reports
Users can download the results of their finished scan jobs. SecHub provides these report formats:
-
HTML
human friendly report variant with less details -
JSON
as an also machine readable format. It can be directly used by the SecHub IDE plugins (Eclipse, IntelliJ, VSCode/Codium) -
SPDX JSON
3.1.1. HTML
The main purpose for the HTML report is to have a human friendly report which gives you a fast overview.
At the top left corner you see a traffic light showing either
-
GREEN
-
YELLOW or
-
RED.
|
You can open the details by clicking on "Open details". This allows you to see the full hierarchy from entry point down to data sink and can help you in analyzing this finding. It also shows a description and a possible solution (if there is one). |
The next picture shows a report which resulted in a red traffic light.
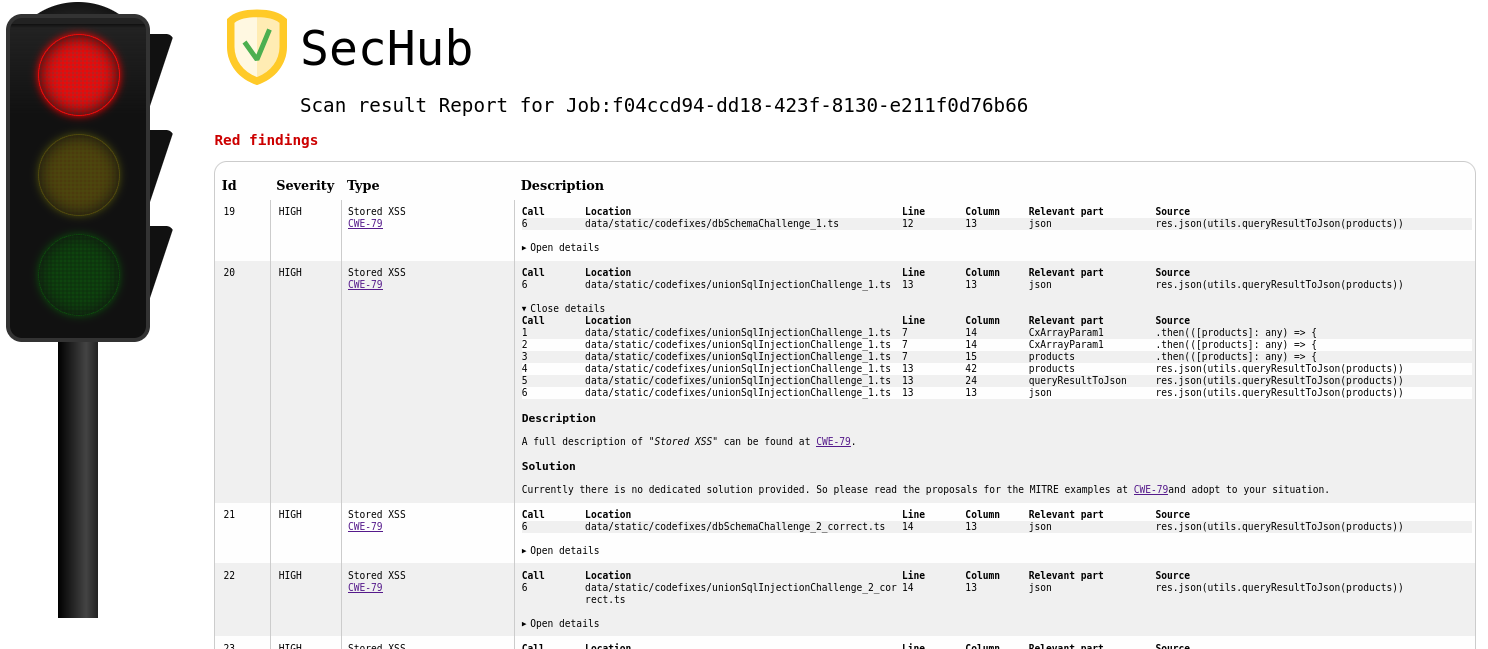
At the top of the report you find the most critical parts - in this example it is a "red" finding with finding ID 19 which is a "Stored XSS".
The second finding with ID 20 is of the same type. Here the details view is opened so more details can be seen.
If available, you can find the corresponding CWE-Id (Common Weakness Enumeration)
as a link to the knowledge base of MITRE in the Type column.
| The SecHub client will exit with a non-zero return code per default only at a RED traffic light, but you can also configure the client to do this on color YELLOW. |
3.1.2. JSON
This is the machine readable report format.
3.1.2.1. Example code scan report with yellow traffic light
{
  "jobUUID": "6cf02ccf-da13-4dee-b529-0225ed9661bd", (1)
  "trafficLight": "YELLOW", (2)
  "messages": [],
  "status": "SUCCESS",
  "reportVersion": "1.0",
  "result": {
    "count": 2,
    "findings": [
      {
        "id": 1, (3)
        "description": "",
        "name": "Absolute Path Traversal", (4)
        "severity": "MEDIUM", (5)
        "code": {
          "location": "java/com/mercedesbenz/sechub/docgen/AsciidocGenerator.java", (6)
          "line": 28, (7)
          "column": 35,
          "source": "\tpublic static void main(String[] args) throws Exception {",
          "relevantPart": "args",
          "calls": { (8)
            "location": "java/com/mercedesbenz/sechub/docgen/AsciidocGenerator.java",
            "line": 33,
            "column": 17,
            "source": "\t\tString path = args[0];",
            "relevantPart": "args",
            "calls": {
              "location": "java/com/mercedesbenz/sechub/docgen/AsciidocGenerator.java",
              "line": 33,
              "column": 10,
              "source": "\t\tString path = args[0];",
              "relevantPart": "path",
              "calls": {
                "location": "java/com/mercedesbenz/sechub/docgen/AsciidocGenerator.java",
                "line": 34,
                "column": 38,
                "source": "\t\tFile documentsGenFolder = new File(path);",
                "relevantPart": "path",
                "calls": {
                  "location": "java/com/mercedesbenz/sechub/docgen/AsciidocGenerator.java", (9)
                  "line": 34, (10)
                  "column": 29,
                  "source": "\t\tFile documentsGenFolder = new File(path);", (11)
                  "relevantPart": "File" (12)
                }
              }
            }
          }
        },
        "type": "codeScan",
        "cweId": 778
      },
      {
        "id": 2,
        "description": "",
        "hostnames": [],
        "name": "Insufficient Logging of Exceptions",
        "references": [],
        "severity": "INFO",
        "code": {
          "location": "java/com/mercedesbenz/sechub/docgen/usecase/UseCaseRestDocModelDataCollector.java",
          "line": 137,
          "column": 5,
          "source": "\t\t} catch (IOException e) {",
          "relevantPart": "catch"
        },
        "type": "codeScan",
        "cweId": 778
      }
    ]
  }
}| 1 | SecHub job UUID |
| 2 | Traffic light color of report - here YELLOW |
| 3 | Finding ID inside report |
| 4 | The name of the vulnerability in our case an Absolute path traversal where attackers could try to manipulate path input, so output could contain unwanted content/wrong file (e.g. a passwd file etc.) |
| 5 | The severity of this finding (will be used to calculate the traffic light color) |
| 6 | Entry point location in this case the Java class where the potential malicious input starts |
| 7 | Line number of entry point |
| 8 | Next call hierarchy element this is the next element of the call hierarchy, means what is called by entry point with potential malicious content as parameter. This is ongoing until last entry inside call hierarchy which is the so called "data sink" |
| 9 | Data sink location |
| 10 | Line number inside data sink |
| 11 | Source snippet |
| 12 | Relevant code part where the found vulnerability lies/could be exploited |